If you are like me, this is the time of year when you are grateful for the bounty of summer squash and zucchini in your garden, but also wondering, “why did I plant so much?” and “what to do with all of this veg?”. Every year I make grilled squash, baked squash with cheese of some sort, thinly sliced squash ribbons for salads, and of course, some sort of zucchini bread in an attempt to ensure nothing goes to waste. This year, the bounty is as crazy as usual, so I tackled one of the recipes that uses a good amount of veg and turns out great results, zucchini bread. However, I added in blueberries this year, making an absolutely amazing blueberry zucchini bread! This bread was incredibly moist. AND there was enough batter to make a standard sized bread, as well as 6 bonus muffins!
I will cut to the chase and get to the recipe, because I am challenging myself to also construct a new recipe for potato/zucchini latkes! That one is coming at you in the near future!
2 – 2 1/4 cups shredded zucchini (no need to wring out or drain)
3 cups AP flour
1 Tbsp fresh ground cinnamon (if possible). If store bought, up amount to 1 1/2 Tbsp
1 healthy pinch of ground clove
1 teaspoon fine sea salt
1 teaspoon baking powder
1/4 teaspoon baking soda
1 pint fresh blueberries
Instruction for Blueberry Zucchini Bread
Preheat oven to 350 degrees F. Using vegetable oil and paper towels, grease a 6 muffin tin and a standard loaf pan generously
Beat the oil, eggs and vanilla in a large bowl
Fold in zucchini
Add in cinnamon, clove, baking powder and baking soda. Lightly whisk together
Add in sugar and whisk only until combined
Toss blueberries in a tablespoon of flour, just to coat and then fold into the batter gently
Pour into muffin tin, careful to not overfill. Stay about 1/4 inch below the top of each muffin mold
Pour remaining batter into the loaf pan. Sprinkle with a little sugar (optional). Put the muffin pan on the bottom rack and loaf pan on middle to upper rack
Muffins should be ready in 45 mins. Begin checking at about 40 mins. Test by inserting a knife into center. When it comes out clean, muffins are ready to go!
Loaf should take about 15-20 mins more than muffins. Begin testing once the muffins are out of the oven and claim done once knife comes out clean
For both the muffins and loaf, let cool 15 mins in pan and then move out of pans to cooling rack.
Note: Cooling completely will allow for a nice, clean cut on the zucchini bread, but if you want to eat it hot, I say, go for it!! It may look a bit messy, but with a dollop of butter on top when still hot…YUM! Also, expect the muffins to be a bit more dense, but the bread to be extremely moist. If you are aiming to impress, serve or gift the bread to guests and keep the muffins for yourself, perfect for eating with your coffee!
Cooling MuffinsMuffin StackMuffin and Coffee for the winSuper moist bread!
If you like this recipe. try my strawberry muffin recipe! Both aim to impress and use in-season fruit!
There is nothing better than when you nail down a good turkey recipe. I love being able to add another poultry option into my diet, but turkey can be a hard nut to crack. It is incredibly easy to overcook, resulting in dry meat. It is also quite an undertaking to cook a whole turkey, particularly if you are not cooking for a crowd. This recipe for turkey tenderloin addresses all of that! With tenderloin being just a cut of the turkey, it cooks quickly and can be scaled up or down in terms of amount cooked to suit your family.
I simply LOVE this recipe! What really makes this savory turkey tenderloin recipe special is the marinade. Turkey, by nature, can be lacking in full flavor. The addition of a savory but slightly sweet marinade does the trick. So, let’s get to it!
For the marinade
1/4 cup low sodium soy sauce
1/4 cup vegetable or grapeseed oil
1/2 – 2 tsp cayenne pepper (go with your taste here)
1 Tbsp dark brown sugar (or runny honey, if you prefer)
1 Tbsp dried rosemary
1 stalk of fresh rosemary, sprigs removed from stalk
Mix all marinade ingredients in small bowl. Transfer to a selable bag when ready to marinate.
For the turkey tenderloin
1.5 pounds of turkey tenderloin. This will typically be 2 tenderloin pieces, sold in one package. Aim to go with 2 loins that are roughly the same size for even cooking
1 Tbsp vegetable or grapeseed oil for browning
Instruction
Insert the turkey tenderloin into the marinade bag. Allow to marinate in the refrigerator for 2-24 hours
Preheat oven to 350 degrees (use convection mode, if you have it)
Remove tenderloin from marinade and shake off any excess
Heat a cast iron, or heavy, oven safe skillet on med-high heat. Add oil and when shimmering and brown the top and bottom of the tenderloin
Place pan in oven and allow to roast until internal temp at thickest part of tenderloin is 160 degree F. This should be roughly 20-30 mins. Remove from oven and move to a cutting board to rest
Once rested, slice and enjoy!!
Serving the turkey tenderloin
Turkey goes with just about any vegetable. You can take a Thanksgiving day approach with mashed, cranberry sauce and stuffing, or something more simple. This week I served it with my oven roasted corn on the cob and some lemon parmesan roasted broccoli. Yum!
Corn on the cob is soaked in the husk for 1 hour and then roasted at 350 for 20 minsBroccoli, garlic and lemons are roasted at 350 until tender. Add a sprinkling of parmesan cheese and roast 5 mins more
My husband and I are both taco lovers. Taco Tuesday is a regular weekly staple in our lives. He is a flour soft taco guy and I am a hard, corn tortilla kinda gal most of the time. This tasty taco salad is one version of a taco that we both agree on and enjoy each and every time it is ordered or made at home.
Like most recipes I like to cook, there is no set way that it has to be made. Ingredients can be substituted, flavors swapped, and type of protein updated. I have a recipe for Asian inspired veggie salad feast, that has many of the same elements of a taco salad, but with different flavors and selection of veggies. Small changes allow me to keep staple recipes simple, but add variety in both nutrition and flavor.
1/2 heirloom tomato chopped into bite size chuncks
7 oz. canned corn, drained
7 oz. canned black beans drained
1 lime quartered for dressing individual plates
Cheddar, cotija or other cheese of your choice for sprinkling (1-1 1/2 ounce)
Taco Seasoning recipe
Note: this recipe will make enough seasoning for a number of uses.
1 heap Tbsp. Chili Powder
1 tsp. fine sea salt
1 tsp. kosher salt
1 tsp. sweet paprila
1.5 tsp. black pepper
2 tsp. garlic powder
2 tsp. ground cumin
1 tsp. onion powder
1/2-1 tsp. red pepper flakes (optional – remove if you do not want the heat)
1-2 tsp. dried oregano
Add all ingredients in a jar and shake to mix. Store in dry location until use.
Instruction
Heat large frying pan to medium-high heat. Add oil. When oil is shimmering, add in beef and begin breaking apart as it cooks. When beef is just browned and broken down, carefully drain any excessive oil in pan. You do not want your taco salad to be too greasy!
Add in the taco seasoning and combine. Cook until beef is just getting crispy. Put aside to cool a bit.
While the beef is cooking, wash and dry lettuce, slice and dice other veg, and arrange all vegetables on serving plate.
Add beef to middlle of plate and sprinkle some of the cheese over.
Put remaining cheese to the side for individual sprinkling.
Serving the Tasty Taco Salad
Serve family style, with cheese and lime wedges available for individual plates.
I am on a grilled, roasted or just straight up stone fruit kick. These fruits (peaches, pluots, plums, nectarines, apricots and cherries) are up there in my book. I do prefer some of them cooked (cherries), while others are good just about any which way I can get them! This recipe for spatchcock chicken grilled with summer fruit really hit the spot in our house. Served with quinoa dressed in olive oil, lemon and simple salt and pepper, all aspects of a good meal are covered!
One of the best aspects of spatchcocking a chicken, is that it cooks quickly any which way you decide to cook it. Having been a beautiful day, I decided to use the gas grill this past week and the results were super!
Preparing the chicken
What is a spatchcocked chicken? It is a chicken that is butterflied. The backbone is typically removed and then the chicken is laid flat with the inside of the chicken on your cutting board, allowing for the breast to be pressed. It results in a flat bird that will cook evenly and quickly. Martha Stweart has a great account of all of the details on her website that is super helpful. Check it out if this is a new technique for you.
If you are leery of cutting the backbone and ribs out of the chicken, it is much more common these days to find them already spatchcocked in your store. Or, ask your butcher to do the job for you. Bell and Evans has pre-cut and flattended versions selling in many stores.
Once your chicken is ready to go, dry the chicken completely and season very liberally on both sides with the seasoning of your choice. My chicken/pork rub below is tried and true, if you want to give it try!
Quick Chicken/Pork Rub Recipe
1 Tbsp. each of Garlic Powder, Onion Powder, Sweet Paprika, Brown Sugar
1 Tsp, each of cinnamon, pepper (fresh ground preferably) and salt
This is enough for roughly a 4 lb. chicken. Double, triple or quadruple the recipe to keep some in the cabinet for other recipes. I use this both for pork and chicken, so it does not go to waste!
Ingredients for this complete dinner
A 3-4 pound chicken
Spice rub (roughly 3-5 full Tbsp)
2-3 stone fruits of your choice. You can halve them for grilling direct on the grill grate, or slice them and use a cast iron pan on the grill. See pics below.
Olive oil, salt and pepper, for coating the grill and the pan. As well for drizzlling/sprinkling over the chicken and fruits
Optional: 4 servings of cooked quinoa, wild rice, freekah or farro. Basically, any grain with a good amount of texture to offset the tender, juicy chicken and sweet, soft delicious fruits! Also, a lemon to be grilled to yummy sweetness and used to squeeze over the grains with some seasoning and EVOO.
Grilling instructions
Get grill heated to medium, with an area that is less hot, in case you need to move off the heat due to flare ups etc. Ensure you have oiled the grates. Oil and season the fruits and place into the cast iron pan and then onto the grill. If using halved fruits, place onto grill grates directly. Continue to check doneness. If knife goes through and there is great browning or grill marks, you are good to go.
Once fruit is on, place chicken breast side up and allow to cook for 30-45 mins, until inner temp is roughly 155 degrees F in thigh. 10-20 mins more cooking time.
Drizzle oil on breast side, use basting brush to rub all over breast, legs and wings. Turn over and allow breast to brown to a nice crispy finish! Inner temp in thigh should now be 160-165. Remove and set aside to cool for 20 mins.
Serve with one of the optional mentioned grains and ENJOY! Let me know how your chicken turns out.
If you have a few more stone fruits hanging out in your fruit bowl, give this stone fruit salad a try!
Growing up, I was a challenging kid to feed. It took me until my twenties to decide that there was a lot of value in trying a variety of vegetables….or much else, for that matter. No sauces, no greens, picky about meats…all of it! My sisters and mom did what they could, and I can say that there were a lot of bowls of cereal and stacks of pancakes in my life! hahaha. However, I cannot remember if there was any homemade scratch pancakes or not! 😉
So, you would think that some of these childhood staples would be the last thing I would ever want to go to now, but pancakes, are still a, now and then, indulgence in my life. I have found that homemade scratch pancakes are even better than those out of the box and are not that much more of an effort. Most ingredients are in the cabinet and you can take them straight up, or add any fruit of your choice. As a matter of fact, no one should judge if one were to do pancakes for lunch or dinner every now and again!
I will warn that this recipes turned out about 16 or so pancakes, so throttle it up or down in size based on the group you are feeding. However, I now have about 8-10 of them wrapped in 2s in parchment paper, frozen in freezer bags and they freeze amazingly. They cook directly from frozen in the toaster when you want that extra treat with your coffee or tea!
Also, this recipe uses cake flour. I had purchased King Arthur cake flour to make my almond angel food cake. It has a lower amount of protein than all purpose flour, which amount to fluffier, lighter consistency. With this flour on hand, I was very curious what else I could do that would benefit from using it! This is how I arrived at homemaade scratch pancakes. If you do not have cake flour on hand, go ahead with the all purpose…very few pancakes are not edible, as far as I am concerned!
Ingredients
2 2/3 cups cake flour
1 tsp table salt
2 Tbsp baking powder
1/3 cup granulated sugar
2 large eggs
2 1/2 cups whole or 2% milk
6 Tbsp canola or vegetable oil
1 tsp pure vanilla extract
Butter (to cook with and to top finished cakes)
Instruction
Mix all dry ingredients together in a bowl, using a whisk to fully combine
In a large bowl, mix eggs, oil, milk, and vanilla
Slowly add the dry ingredients into the large bowl of wet ingredients, whisking to combine. Do not overwork. Simply whisk until smooth. The batter will be a bit on the thin side. If you prefer thicker cakes, add just a bit more flour and combine
Heat a large skillet or griddle. Be sure you have medium to high heat that will quickly cook the first side to golden brown before turning to brown the 2nd side. Keep a stick of butter at the ready and add in a pat and allow to melt out before pouring each batch of batter. Add 1 pancake to start and test to ensure your heat is high enough, but not burning the pancakes. When tester is perfect, Rock n Roll!!
Continue to add only as much butter as needed to coat the pan and provide the yummy browning. I used a 1/3 cup measuring cup and filled it about 3/4 to arrive at the perfect size pancake
First 2 pancakes. Not perfect, but darn yummy! They only got better, in terms of even browning from there…
Pancakes can be doled out as you go, or lightly cover with foil and sit in a 250 degree oven until all are ready to go.
Adding the extras!
What does not go with a pancake? If you prefer to add ingredients into the batter, all the usuals are on the table. Strawberry, apple, berries of all kind, chocolate chips, butterscotch chips. So many options. But, for this recipe, where the work was put in to make them from scratch, I went straight up NH Maple Syrup and a tab of butter on each cake. Simple and delicious!
If you like this recipe, try my recipe for almond angel cake. It is a perfect slice of heaven to have with a cup of coffee or tea!
There is nothing better during the summer than the in-season fruits. I am a sucker for stone fruits. Peaches, nectarines, plums, pluots…I love them all. Typically, I love these fruits because they can be grilled and add that pop of sweetness that goes amazing with pork or chicken. Heck, I will pair them with just about anything. However, this stone fruit salad is not grilled, making it a fast and easy dish for any outing or BBQ you attend!
The truth of the matter is that you could grill the fruits for this dish, I simply did not have the time on the day that I made it. I would definitely caution that in order to grill, the fruit will need to be a little bit les on the ripe side in order to be able to layer it on the plate.
Quick and easy ingredients!
1-2 ripe, but solid nectarines as well as white or yellow peaches (really, any stone fruit with enough size to cut and arrange will do)
1 ball of fresh mozzarella (8 ounce)
1 bunch of fresh basil
Flaky sea salt and freshly grouond black pepper
Slicing and arranging
Slice the peaches and nectarines into half moon shape, once you have removed the stone from the fruit. By the way, if you have not researched how to remove the stone from a stone fruit (guessing most have not!), I found this super helpful video that makes this task as simple as it could be!
Slice the mozzarella into similarly sized slices
Once all is sliced. arrange on round plate, layering in the mozz and fruit, in a pattern appealing to your eye! Dot washed basil over the salad as well. Hit it with the flaky sea salt and pepper. Voila! Stone fruit salad!
Optional flourishes – 2 tsp fresh lemon juice, extra virgin olive oil, balsamic glaze, pomegranate molasses. Note: if you are preparing ahead of time, do not add the liquid options until serving and ensure you can refrigerate once served. A spray of lemon will also help with any browning if not consuming right away!
If you like this recipe. you may also like my suggestion for serving an amazing fruit plate. Let them eat fruit!
Cooking is something I have loved to do for ages. Kicking around in the kitchen all day on a Sunday, prepping, organizing and getting something good on the table as well as ready for the week is my happy time. However, baking and making sweets is a new phenom for me. Now, my cabinet has all sorts of chocolate baking bars, a number of types of sugar, espresso powder and numerous extracts. I find myself picking up graham cracker crusts, puff pastry, and apparently, a can of black cherries that I grabbed off the sales rack when shopping. So, each week I am trying to find or create recipes to use up some of these lay-around goods. This is how I landed on this recipe for Black Cherry Chocolate Mousse.
This is yet another recipe that I need to credit Jamie Oliver for. It is a simple 5 Ingredient recipe, so no fear, sweat and tears necessary!
Separated eggs, sugar, heavy cream, chocolaet and canned cherries
Ingredients
7 ounce dark chocolate. The recipe calls for 70% cacao. I had various bars and chips on hand that were 100%, 60% and 78%, so I simply calculated the ratio of each needed to amount to the 70%
1 15oz can of dark or black cherries. For my next go at this recipe, I look forward to using fresh strawberries and perhaps macerating them a bit before adding to the dessert
3/4 cup + 5 Tbsp of heavy cream
4 eggs, separated. Be sure to not get any of the whites into the yolks and vice-versa. If you get yolk into the whites, it can typically be removed using half of a shell
2 tsp very fine sugar. If you have a small food processor, you can pulse standard white sugar until powdery and fine
Pinch of sea salt
Instruction
Simmer cherries and their juice in small saucepan on medium heat just until thickening. Remove and set aside
Setup a double boiler (sauce pan of simmering water with a bowl placed atop, without touching the water) and place chocolate into bowl. Continue to stir with silicone spatula while it melts. Once fully melted, remove bowl from simmering pan and set aside to cool
Whip the cream until soft peaks form. Add the sugar and egg yolks. Whisk to combine
In a medium-large bowl, add the sea salt to the egg whites and whisk until very stiff peaks have formed. Note to use a clean whisk and bowl
Once the chocolate is fully cooled, add to the cream mixture and fold in with silicone spatula
Very gently fold the chocolate/cream mixture into the stiff egg whites. Do not go rough here, as it will become very dense. This takes a little patience. Some smooth background music is never a bad thing when baking/cooking. Wink!
This recipe is indicated to be 6 servings, but this all depends on the size of your serving glass. I used a typical highball glass, so the desserts were quite generous at 3 servings. If you have a smaller container to use, I do recommend going closer to the 6 servings!
If you make this, send me a pic and/or let me know how it goes! Also, a layer of fresh whipped cream would be super before adding the fruit. YUM!
Some months back, there was a raging sale on Petite Sirloin Steak at one of my local stores. Admittedly, this is not a cut of beef that I typically purchase, but I will give most things a go. So I went for it! I actually froze it when I got home and it sat for quite a while. While digging around to decide what might tickle my fancy for meals during the week, there it was. Just waiting for its’ day in the spotlight. Just one night to defrost and I was off and running!
What to do with this cut?
My first step in figuring out what to do with this cut was to do what we all would do…go to the internet! I found a site called, “Beef, It’s what’s for dinner” that gave some good info about what type of cut the Petite Sirloin is and best cooking methods. The issue was that I had not anticipated needing to marinate for hours, and the Petite Sirloin is the type of cut that really needs it. Athough the article indicated grilling or broiling was the best method for this little bugger of a cut, I began thinking about alternatives. Instant pot? Air Fryer? Slow Cooker? After a bit of research, I stumbled on a blog called, “No Spoon Necessary”. Low and behold, there was a slow cooker recipe fit for just about any steak. The recipe can be found here.
The ingredients in the recipe were relatively simple, so I only made changes where I did not have an ingredient, or wanted to bend the flavor a bit to my taste. And given this is a slow cooker recipe, the only real work was the slicing and dicing and reducing the gravy once the steaks were done. Amazing!
Ingredients
2.5 lbs. petite sirloin steaks (roughly 4 steaks)
1 white or yellow onion, finely chopped. Note: the original recipe calls for sliced onions. I used chopped to have a bit of a chunky onion sauce to serve with. Do your thing with this one.
2 cups low sodium beef broth
2 Tbsp Worcestershire Sauce
1 Tbsp Onion Powder
1 Tbsp Garlic Powder
1 Tbsp dried Thyme
1 Tbsp dried Rosemary
2 large garlic cloves, pressed through garlic press, or very finely minced
2 Tbsp butter
2 large Rosemary sprigs
Salt and Cracked Black Pepper
Parsley to finish
Instruction
Line bottom of the slow cooker with the onions. Season steaks with salt and pepper and place steaks on top of onion, spreading them out side by side. Pour in the broth and Worcestershire. Mix all other ingredients, other than butter, parsley and rosemary sprigs, in a small bowl. Distribute evenly over the steaks. Add butter pats and rosemary sprigs on top and close that cooker up!
My slow cooker tends to cook really fast. I cooked for 5 hours on low. However, check your steaks for doneness at 4.5-5 hours and adjust accordingly. Once done, using a slotted spatula, scoop out and plate the steaks. Cover to keep warm. You will be left with a lot of broth in the slow cooker that can be made into an amazing onion gravy. If there is any obvious fat on the top of the broth, scoop off while still in the slow cooker. Then transfer to a wide frying pan.
Bring heat to medium and sift in 1-2 Tbsp. of flour. Go gradually, so you know how much you need. The gravy will thicken pretty quickly, so just be patient. Use a whisk to get all lumps out. Continue to whisk until it is at what you consider gravy thickness. If you have a gravy boat that separates the fat, use it. If not, simply check the gravy as it sets for fat settling on top and remove.
Plate and serve gravy as your family likes it! Either family style on the plated steak, or in the gravy boat, for each to serve themselves! Serve with my vegetable tray bake recipe! YUM!
Notes
This recipe will not deliver a steak with char or caramelized exterior. It will delivery a deliciously tender steak that is amazing with gravy, similar to how you would cook a pot roast. But change and new experiences are everything, so give it a go!
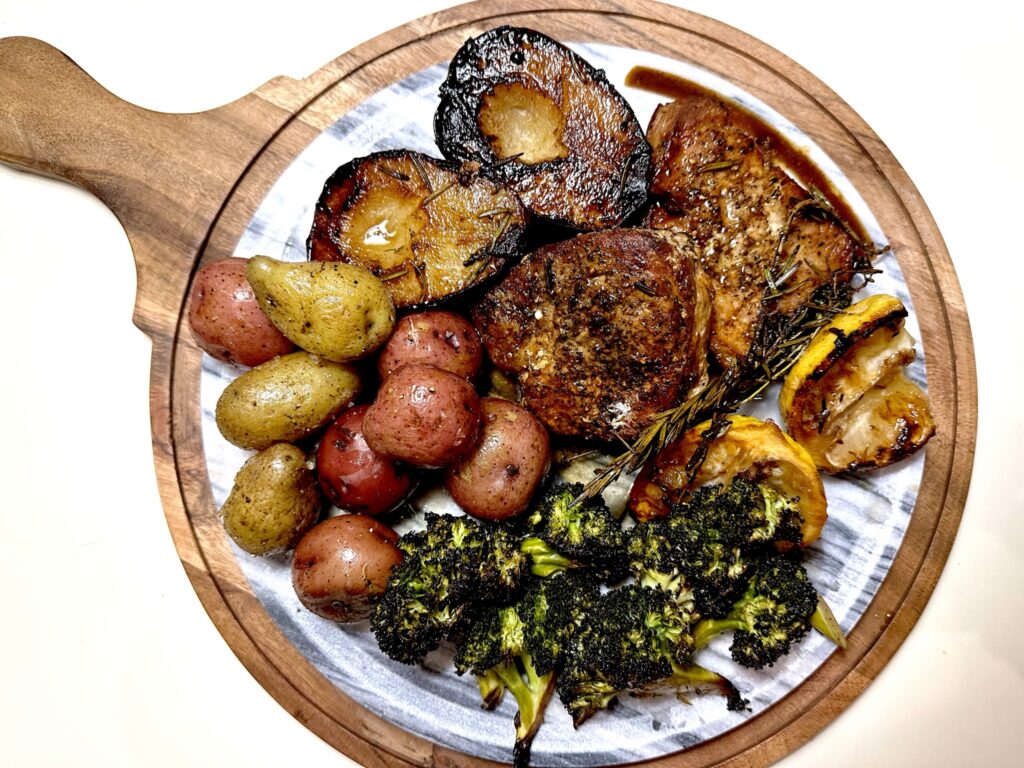
The veggie tray bake shown with the slow cooker petite sirloin is a play on my originally posted recipe. This time I used potato, radish, broccoli, carrot, garlic and shallot. Winner every time!!
There is nothing I love better than finding a recipe that surprises me with its’ simplicity and bomb flavor! This pork and porcini pasta does exactly that.
If you have read any of my other posts, you may know that I grew up an incredibly picky eater. I could stomach about 3 vegetables, one being potatoes! One of the things on my absolute no-go list was mushrooms. That lasted well into my thirties, even after I had realized that I actually had an affinity for veggies of all sorts (once I actually began tasting them!). It took a lot of travel and eating with varied groups of people to get me out of my no zone and into my go zone when it comes to food. And I am thankful for that! Otherwise, I would not be sitting here writing about this amazing pork and porcini pasta!
The origin of the recipe
If you have read other recipes of mine, you might also know that I am a Jamie Oliver fan. His 5 Ingredient cookbook changed my world, at least in my kitchen! Check out this preview of the book on Google. This book has so many easy weeknight or lunch recipes that my book binding is completely broken from use. This is one I will tape, rubber band or perform some sort of ridiculous glueing procedure to ensure it stays kicking around! Some of the recipes have been committed to memory, or are flexible enough that I know the gist of the ingredients and wing it from there. Truly enjoyable cooking! Anyhow, this oprk porcini recipe is very close to one in “5 Ingredients”, with only tweaks to the ingredient amounts.
Recipe by kristenCourse: Dinner/Lunch, Food, Kristen CooksCuisine: PastaDifficulty: Easy
Servings
4
servings
Prep time
10
minutes
Cooking time
20
minutes
Ground pork with porcini mushrooms and rotini pasta
Ingredients
1 pound ground pork
1 1/2 oz dried porcini mushrooms (or any mix of dried mushrooms of your liking)
1 onion, diced
12 oz dried pasta (I used rotini here, but penne, large shells, rigatoni or other types where the mushroom and pork can get lost in the pasta works great!)
1 3/4 oz parmesan cheese (finely grated)
Ingredients that Jamie Oliver does not consider part of the 5 core ingredients
1 Tbsp grapeseed oil 1 Tbsp red wine vinegar
Salt and Pepper
Directions
Boil about 2 cups of water. Place the dried mushrooms in a small bowl and cover with boiling water. Ensure they are fully covered.
Cook the pasta per the box instructions, but remove 1-2 mins short of the cooking time. Pasta should be al dente, as it will cook further when combined with other ingredients. Drain, reserving 1 cup of the starchy water. Set aside
Heat oil in large frying pan. Add pork and continue to break up as it browns. If there is excessive oil, drain carefully before moving to next step. Keep an eye on your pasta…do not overcook! Wink!
Drain the porcinis, reserving all of the water left behind. Add the mushrooms and onion to the pan with the pork. Fry until all is golden
Add the red wine vinegar and the porcini water. Note that the last bit will have gritty bits, so add slowly and stop when the grit is visible, so as not to add. Turn heat to low and allow to simmer about 8-10 mins.
Add the drained pasta to the frying pan, as well as 1/2 cup of the pasta water. Add in most of the parmesan, reserving a small bit to add over top once served. Toss to combine
If sauce is too thick, add remaining 1/2 cup of pasta water and stir until you have the consistency you want
Add salt and pepper, as well as more oil over top to taste. Curly or flat leaf parsley is also an option to garnish. Enjoy!
If you like this recipe, take a peek at my recipe for Asian Inspired Veggie Salad Feast, which was also a Jamie Oliver inspired dish!
I try to weave an assortment of types of proteins into our meals during the week. We are big on eating pork, chicken and beef, but my husband and I are both huge fans of a good piece of fish. However, fish can be tricky, because we both prefer it fresh, but that is not always convenient or cost effective. In comes one of our latest staples…frozen barramundi! I have tried frozen fish many times and nothing has come close to this brand we recently began purchasing called “The Better Fish“.
I know I am losing some of you now, mentioning that I am using frozen Barramundi fish, but stick with me on this one. This fish defrosts easily and unlike other frozen fish I have failed with, it keeps its’ firmness and integrity. What is Barramundi? Well, basically it is an asian sea bass. And it is AMAZING! My husband will attest that there is no fishiness and the firmness of this fish holds up to bold flavors and makes an amazing meal!
I love anything with lemon and I LOVE capers! So, this recipe is one I can go to over and over, and never disappoints me! The ingredients are simple and cooking method absolutely manageable!
Defrost fish as instructed on the packaging. I can attest that taking the fish out of the freezer 1/2 hour before wanting to cook, and placing the vacuum sealed bags in cold water for 15-20 mins will leave the fillets ready to dry completely with paper towels, season and prep for cooking!
Season barramundi with salt and pepper liberally. Do not be shy. This is not a wimp of a fish!
Heat grapeseed oil in large sautee pan and when shimmering, carefully place filets in. Cook just until bottom side is beautifully browned and turn. Second side will cook quickly, as fillets are thin. Remove and place on plate in warm oven to sit while you make the amazing sauce!
Melt butter in same pan, add garlic and cook just until fragrant. Add lemon zest and juice, capers and a few pinches of pepper. Reduce to about half and then taste. Add salt, if needed.
Plate Barramundi and pour the caper sauce over top and serve!
Serving Suggestions
This fish and sauce goes great over pasta, as well as over vegetables. My recommendation is a combination of zucchini/summer squash noodles and bucatini noodles. You cannot get better than the satisfaction of the pasta, but also the freshness and crunch of the zucchini or summer squash noodles. A super winning combination!
If making the zucchini/squash noodles, simply wait until 1-2 minutes before your pasta is done and toss in the veggie noodles. They just need to be softened lightly. You want to maintain some structure. Drain all of it together, no need to rinse at all! Note: if you are not making pasta, you can follow the same philosophy and boil veg noodles for 1-2 mins in salted water and drain!
If this recipe was fun for you, give my weeknight smorgasboard with flounder and homemade mediterranean mezze a try!
My husband and I spend a lot of time in the Lakes Region of New Hampshire. There is a seasonal restaurant called Inn Kitchen and Bar located at the Squam Lake Inn in Holderness, NH. It took years of us visiting the area before we finally bucked up, made the ride and reservation.
If you are in the area, I highly recommend giving this place a go! It is an old house, converted to beautuful inn and restaurant. The bar is inviting and the indoor seating cozy, but modern. There is also a lot of outdoor seating, but the indoor was so quaint, any return visit we made was either at the bar or at a table in the bar area.
The menu is small, but powerful. I was surprised when my husband, of all things, decided to start with the beet hummus that was on the menu on our first visit. I rolled with it and am so glad that I did! It was amazing! If you love hummus, which we both do, the addition of the beets adds just enough sweetness to make this a somewhat obnoxious step sister to your usual lemon hummus. You know, the one that is a little too high spirited, but loved, nonetheless for her spunk and ability to stand out!
Anyhow, I got home and got down to figuring out how to make this something that we could enjoy at home, when the ride to Holderness, NH might not be in the cards for us. I think I have nailed this one. Perhaps not the exact recipe, but one that I can definitely live with and am proud of!
The glory of this recipe is that it is fast and easy. The longest bit of work is waiting for it to chill in the refirgerator. I looked at many recipes trying to get to one I liked, most of which called for roasting beets and waiting for them to cool before using. I have skipped all of that nonsense and used canned beets, that can be used directly into your food processer. Food hack for the win!
Ingredients
1/2 of a 15 oz. can of whole beets drained, 1 15.5 oz. can of chickpeas drained, 1 lemon zested and juiced, 1-2 fairly large garlic cloves, 2 tsp, cumin, 1 tsp. black pepper, 2 tsp. kosher salt, 3 heap Tbsp. of tahini. 1/4 – 1/3 cup olive oil.
Instruction
This is as simple as it gets! Add all ingredients, with the exception of the olive oil into a food processor. Pulse until smooth, stopping to use a silicone spatula to scrape down sides of the processer to make sure all is getting incorporated. If you are not getting a smooth consistency, taste and then add either more lemon juice or more tahini, pulse and check for consistency and taste. Once mostly smooth, pulse while drizzing in the olive oil. Add until fully smooth and incorporated. You can use more or less, based on your taste. I tend to add only what I need to get the thin/thickness that I like.
Chill before serving
Once you have tasted and seasoned to your liking, let the hummus cool in the refrigerator for an hour before serving.
Toppings
I like to serve out what we will be eating for a particular meal and top only that amount. Cover the rest to be saved in the refrigerator topping only when being served. My favorite accompaniments would be Zaatar Spice, Sumac Spice, Olive oil and toasted pine nuts. All can be found at most grocers, or ordered online.
To serve
This beet hummus goes with just about any bread, vegetable or meal! I like to serve with carrot and cucumber sticks, pita bread, crispy crackers, definitely red onion and any charcuterie or pickles/cornichons that you have at hand! Have fun with it!! This beet hummus can definitely be the centerpiece of any appetizer board for entertaining.
If you like this recipe, you might also like my recipe for Dilly, Minty tzaziki!
In the summer, I am always looking for recipes that will leverage all of the fruit that is in season. I was never one for baking, but over this past year, I have become obsessed with finding recipes that are not only a little bit of a challenge for me, but taste and look amazing. This recipe for Angel Food Cake was fun to make, goes great with just about any fruit you have in the house and was definitely husband approved!
One of my go to resources in the kitchen is the America’s Test Kitchen website. There are endless recipes, helpful hints and reviews of kitchen gadgets (another one of my obsessions). They have multiple versions of Angel Food Cake, of which this recipe is a bit of a simple spinoff.
Required Tools
Food Processor
Mixer
Angel Food Cake Pan (tube pan)
Rubber Spatula
Sifter
I used a food processor, as well as a mixer, but a blender and/or hand mixer could be substituted in. A fine mesh sieve can be used in place of the sifter.
There are only 6 core ingredients in this recipe, making it quite manageable.
1.5 tsp Almond Extract (you can substitute Vanilla, if desired)
Optional Ingredients
Any type of berry, banana, or other fruit, confectioners sugar for dusting, whipped cream or mascarpone to top
Instruction
Preheat oven to 325 degrees F. Set rack to middle position in oven
Using a food processor or blender, pulse all of the sugar until it is a very fine consistency. Remove 1 cup of the sugar from processor and set aside
Add the salt and flour to the processor and pulse only until combined
Add the egg whites and cream of tartar to mixing bowl. Set mixer to medium high and slowly incorporate the 1 cup of sugar that you had set aside. Mix until you have soft peaks. This should take about 5 mins. Feel free to stop and check the mixing attachment to ensure you are not over mixing. Once you have soft peaks, add in the Almond Extract and mix for only the seconds it requires to be completely distributed
Here is where you need some patience. To avoid creating a dense Angel Food Cake, sift the flour mixture into the egg mixture very slowly, using your spatula to fold in the dry ingredients. Slowly work out any pockets of flour, but the name of the game it to not overwork the batter and work slowly getting it combined
Once batter is ready, pour into ungreased Angel Food Cake pan. Use spatula to lightly spready out the batter evenly
Bake for 40-50 mins, beginning to check for a golden brown top at the 40 min mark. The top should feel springy to the touch
Invert cake, in the mold, upside down onto a cooling rack and allow to cool in the mold for 2 hours. Once cooled, carefully run an icing spatula (if you have it) around edge of cake to release cake, with the bottom of pan from main part of pan. If you do not have an icing spatula, a flexible knife will do the trick. Carefully remove the bottom of pan and turn cake over, bottom side up on your platter.
Finish with confectioners sugar and fruit, as desired!
Recipe for Homemade Whipped Cream
Ingredients – 1/2 Cup Heavy Cream, 1 Tablespoon confectioners sugar, 1/2 tsp pure almond extract
Instruction – Using stand mixer, hand mixer or a bit of resilience and a hand whisk, add all ingredients into bowl and whisk until peaks are smooth and the consistency looks like you would serve it. If using a stand mixer, be sure to pay attention to ensure you do not over whisk. Whipped Cream can be stored for up to a day in the refrigerator in a tightly covered container
Tips
Do not skimp on the Almond Extract. Only use pure
When separating the egg whites from the yolks, use a separate bowl and separate each on its’ own, before adding to the rest of the whites. This is to ensure there is NO yolk in the mixture of whites. If some yolk does get into your whites, use a shell half to fish it out and remove
If you decide to use Vanilla, rather than Almond Extract, also adjust the recipe for whipped cream to also use
Do not substitute in flours other than Cake Flour
Be sure to use an Angel Food Cake pan, and not a Bundt Cake pan. It will be too difficult to get the Angel Food Cake to release
This is the absolute simplest of summer treat recipes, and it is actually quite healthy. Frozen bananas are covered with dark chocolate and rolled in nuts, for a cold, sweet, bitter and crunchy treat. They have it all!
Simple Ingredients
2-3 large bananas, 1 tbsp. peanut or almond butter, 1/4 cup dark chocolate (chips or broken bar, for melting), 1/2 cup chopped walnuts, 4 wooden craft sticks
Instruction
Cut bananas in half. Insert the stick into the cut part of the banana, ensuring it is in about half of the length. Freeze bananas on a tray for 3-5 hours. Melt chocolate and peanut butter in double burner. Stir to combine until completely smooth. Remove from heat. Note: the double burner is a pan of boiling water with a bowl placed over that has no contact with the water. The chocolate is then melted slowly in the bowl and not over direct heat. For this recipe, you will want a rather large bowl in order to be able to roll the bananas in the chocolate, once melted
Here is where you need to work quick. Have your nuts spread on a large and shallow enough plate that you can roll the banana, with the stick into the nuts. Roll each banana into the chocolate and VERY quickly into the nuts. If you work too slowly, the chocolate will harden and nuts will not stick
Freeze until nuts and chocolate are completely set on the bananas, roughly another 1 hour. Then, ENJOY!
A couple weeks back, the local grocery store had a deal on strawberries. 2 pounds for $5, which is a pretty darn good price! They were a rich, deep red color and looked too attractive to leave at the store! I immediately pulled out my phone to scroll around looking for recipes that I could use this yummy looking fruit in. I landed on strawberry muffins. Muffins seemed easy and practical, because they can be eaten with coffee in the morning or as dessert after dinner. As well, they can be frozen and used another day.
The recipe that I found and used, just about to the letter, was from a blog called Inspired Taste. The recipe is for Perfect Strawberry Muffins and it definitely was one worth keeping!
Things that I loved about this recipe:
There is just a little hint of black pepper added to the batter to add some interest
The topping is a simple mix of vanilla and white sugar, giving the finished muffin just a bit of crunch on top. I am looking forward to trying this recipe again, substituting in apple or apricot and using almond extract, rather than vanilla
It was rather flexible. After hulling and cutting my strawberries, I had 2 extra ounces of fruit. I used it all, and the finished product was still light, but very, very moist!
Heat oven to 400 degrees. Line 12 muffin cups with standard muffin liners
Whisk all dry ingredients in large bowl until well combined
Using 1+ cup measuring cup, measure the oil. Add the egg and then fill with the milk until it reaches the 1 cup line
Add the vanilla extract to the oil/egg mixture and stir to combine
Pour wet ingredients into the dry ingredients and slowly combine with fork. Do not overmix
Fold in strawberries gently, until evenly distributed
Divide the batter across the 12 muffin cups
Combine topping ingredients in small bowl and then distribute across 12 muffins
Bake for 15-25 mins, checking with toothpick for doneness at the 15 min mark. When slightly crumbly crumbs come out with toothpick, they are done. The top should be nicely browned with bits of crisp sugar yumminess!
Set aside on wire rack to cool. Do not remove from muffin liners until completely cool, or serve directly in liners
I love when I stumble on something on the sale rack at my local grocery that I have never used to cook with. I am a huge fan of capers, regularly going for the picatta if I am splurging on a pasta meal. However, when I saw jarred caperberries, such as these from DeLallo marked down at 50% off, I simply had to buy and try! I immediately started a search for recipes that could use this unusual ingredient and found a chicken leg tray bake that would fit the bill.
Not only did this recipe have a cut of chicken that my husband loves and is incredibly inexpensive (chicken legs), it also is a tray bake, which is one of my absolute favorite types of easy, weeknight meals. A one pan wonder, with the addition of bread, which adds a heartiness to the meal, but also the glorious crunch when the bread takes on the fat from the chicken while roasting in the oven.
I am a lover of the lemon. If you give me a recipe that roasts, toasts, warms or broils a lemon, I am all about it!! The original recipe that I found is called Chicken Roasted on Bread with Caperberries and Charred Lemons, from Food and Wine. The ingredients are simple and include my ever loved lemon, as well as these mystical caperberries! I have made this recipe a couple times now and have added my own spin and can provide some advice. I also make this for 2, which is roughly (I went heavy on the bread) half of the original recipe, but you can double to make 4 servings. My adusted ingredients and instructions below:
Ingredients
2 large whole chicken legs
2 medium red onions – slice off the top just enough to allow the onions to sit flat. Leave root end intact, but peel outer layer off and discard. Sit onions up and cut into 4 quadrants, just leaving a about a quarter to a half inch left at bottom, so it appears as an onion flower. See pic below as example of cooked red onion:
1/4 – 1/2 pound of crusty bread. Original recipe calls for sourdough, but a day old French baguette or Ciabatta could do the trick. Rip the bread into 1 inch square pieces (roughly). Do not go too small on these. You want them to crisp on the outside, but leave a little bit of moisture in.
1/2 cup of jarred caperberries, drained. If you are buying this item to simply try it, do not be tempted to add all of them to use up the jar. It will cause the chicken dish to be too briney in the end. Put aside the others and use on a charcuterie board for your next hosted gatheting. If anything, these caperberries present themselves well. Any tray is sexier with them on it!
2 lemons, cleaned and halved
3 Tbsp. cup of grapeseed oil – stick with me on this one. If you are not buying this amazing oil, go out and get it. EVOO is only made for low temp cooking. We are going to blast the fire in this recipe, so go with the tried and true grapeseed. If you do not have this on hand, vegetable or canola will do!
8 garlic cloves, in the skin, but smashed a bit to let out flavor
Salt, Pepper, and if desired, a dash or 2 of rosemary or thyme
Instruction
This is where the simplicity comes in. Everything goes into one tray! Limiting the mess is always a benefit!
As well, I learned that this can make a heck of a mess on your baking tray, so a layer of parchment will be your savior. Aluminum foil, if you do not have parchment
Preheat oven to 400 degrees F.
Toss the caperberries, bread, onions, garlic and lemons in a large bowl with roughly a tsp. of salt and pepper and other spices you may want to add. Especially ensure that the bread is fully coated. If you need a bit more oil, drizzle more on and mix it all up.
Put mixture on baking tray and arrange the chicken legs on top. Brush legs with a bit more oil, season generously with salt and pepper
Roast until the chicken leg is registering 160 degrees at the thickest part of the thigh. Start checking temp at about 40 mins, but expect anywhere between 40-60 mins, depending on your oven. You will have a crispy skin on the chicken, tender, juicy meat, sweet red onions, crunchy bread nuggets, briney caperberries and lemons that, when squeezed over top, are like candy on the dish!! Enjoy!
If you like this recipe, you may also like my recipe for Rotisserie Chicken!
Follow:
Subscribe to see our latest food, travel and home life updates by entering your email info below