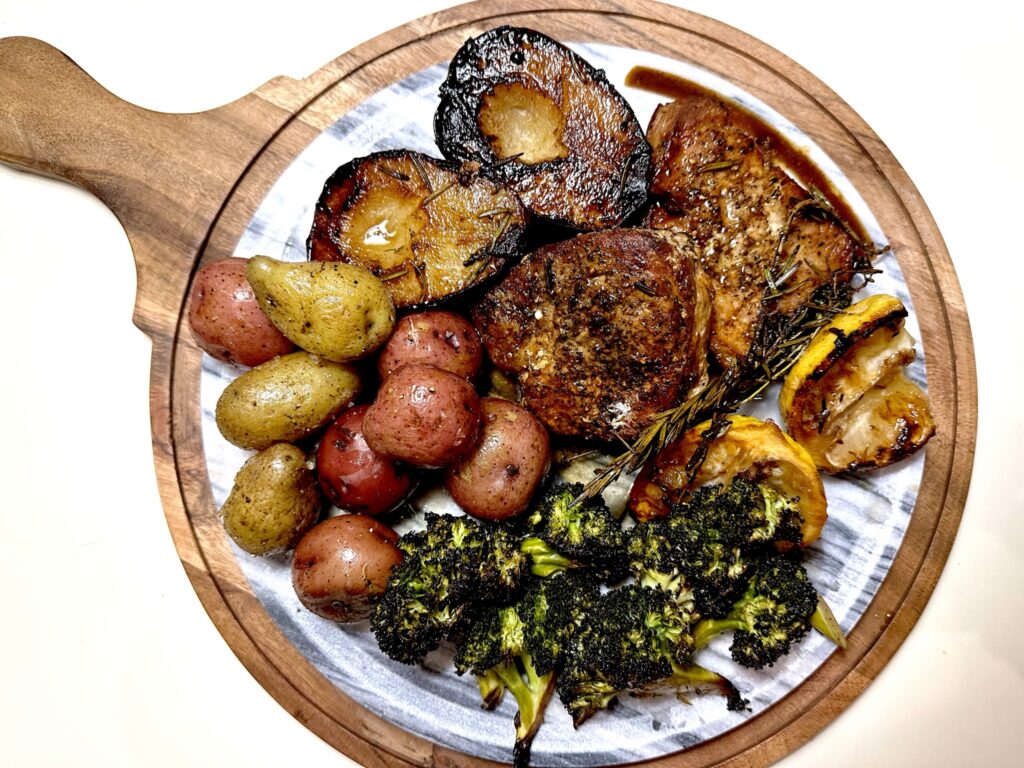
I try to weave an assortment of types of proteins into our meals during the week. We are big on eating pork, chicken and beef, but my husband and I are both huge fans of a good piece of fish. However, fish can be tricky, because we both prefer it fresh, but that is not always convenient or cost effective. In comes one of our latest staples…frozen barramundi! I have tried frozen fish many times and nothing has come close to this brand we recently began purchasing called “The Better Fish“.
I know I am losing some of you now, mentioning that I am using frozen Barramundi fish, but stick with me on this one. This fish defrosts easily and unlike other frozen fish I have failed with, it keeps its’ firmness and integrity. What is Barramundi? Well, basically it is an asian sea bass. And it is AMAZING! My husband will attest that there is no fishiness and the firmness of this fish holds up to bold flavors and makes an amazing meal!
I love anything with lemon and I LOVE capers! So, this recipe is one I can go to over and over, and never disappoints me! The ingredients are simple and cooking method absolutely manageable!
Defrost fish as instructed on the packaging. I can attest that taking the fish out of the freezer 1/2 hour before wanting to cook, and placing the vacuum sealed bags in cold water for 15-20 mins will leave the fillets ready to dry completely with paper towels, season and prep for cooking!
Season barramundi with salt and pepper liberally. Do not be shy. This is not a wimp of a fish!
Heat grapeseed oil in large sautee pan and when shimmering, carefully place filets in. Cook just until bottom side is beautifully browned and turn. Second side will cook quickly, as fillets are thin. Remove and place on plate in warm oven to sit while you make the amazing sauce!
Melt butter in same pan, add garlic and cook just until fragrant. Add lemon zest and juice, capers and a few pinches of pepper. Reduce to about half and then taste. Add salt, if needed.
Plate Barramundi and pour the caper sauce over top and serve!
Serving Suggestions
This fish and sauce goes great over pasta, as well as over vegetables. My recommendation is a combination of zucchini/summer squash noodles and bucatini noodles. You cannot get better than the satisfaction of the pasta, but also the freshness and crunch of the zucchini or summer squash noodles. A super winning combination!
If making the zucchini/squash noodles, simply wait until 1-2 minutes before your pasta is done and toss in the veggie noodles. They just need to be softened lightly. You want to maintain some structure. Drain all of it together, no need to rinse at all! Note: if you are not making pasta, you can follow the same philosophy and boil veg noodles for 1-2 mins in salted water and drain!
If this recipe was fun for you, give my weeknight smorgasboard with flounder and homemade mediterranean mezze a try!
I have seen many recipes for German red cabbage, and most are absolutely in my wheelhouse and are recipes I would serve any day of the week. This is because they are crunchy, sweet, vinegary and amazing! These are ingredients that are easily found or are in your house already.
Most of the authentic recipes that I have found for red cabbage involve apple, which makes perfect sense. Sweet and salty and sour….who could argue with these flavors? In this recipe, I have substituted butternut squash for the apple.
As I have learned, red cabbage is served in many eastern Eurpoean countries with pork loin, pork chops, pork knuckle, saurbraten and other beef recipes. In my mind, I can serve it with anything, but if I serve pork of any sort, I always have a sweet element. Usually, I go with apple sauce, or sauteed or grilled pears or peaches. For this meal, the Red Cabbage is sweet enough to make the grade! Stick with me, this one is good…
Ingredients
10 Ounce Red Cabbage, thinly shredded
1/2 small red onion, sliced thin
1/2 small yellow onion, sliced thin
5 juniper berries
1/4 cup apple cider vinegar
1/4 cup white sugar
2 Garlic cloves minced
Optional – depending on your sweet tooth – 2 Tbsp. sweet jam of your choice
2 Tbsp. Butter
1/2 lb. butternut squash cut into 1/2 inch squares
Instruction
SO SIMPLE!
Add butter into pan. When bubbling, add squash. After 3-4 mins when squash is beginning to soften, add onion, juniper, sugar, vinegar and garlic. Keep over middle heat, at a slow bubble.
Add in the cabbage and sautee until cabbage is softened, but still crisp! Enjoy hot, room temperature, or cold. This recipe will taste just as good, if not better, the next day!
This recipe goes amazing well with my recipe for Pork Schnitzel! Pork with a sweet side is always a winner!
I LOVE a German restaurant. In my opinion, there are not enough German restaurants serving genuine German food anywhere here in New England! Years ago there were 2 restaurants in my area of Massachusetts, but unfortunately, both have been closed for years. Incredibly disappointing!! I now live in New Hampshire and had heard about one German place to visit in Hookset, NH, but after discussing gettting there to try the Pork Schnitzel, Saurbrauten, Spaetzle and many of the other menu items that I and my husband love for years, it closed before we ever got there. BOO!
I am always up for a bit of a challenge. So, where to start? Pork Schnitzel, of course! The epitome of the basic German food that draws in the typical first time German eaters that are dipping their toe into a new type of food. I mean, as it is, this is a chicken cutlet, for the most part, and we New Englanders have all eaten that, without doubt (forgive me, Vegetarians and Vegans)!
This recipe is easy, and delivers super crispy chicken cutlets/schnitzel. I kept the recipe very simple, but it turns out amazing! Paired with lemon, like you would be served in Germany or Austria, it is nothing short of amazing! So, let’s get to it!!
Ingredients
1.5 lbs. top loin thin cut pork chops – boneless
2 Eggs
1 Cup All Purpose Flour
1.5 Cups Panko Bread Crumbs, Plain
4 tsp. Kosher Salt
4 tsp. Fresh Ground Black Pepper
Instruction
Lay out large piece of parchement paper over a cutting board. Fold parchment in half and lay 3-4 of the pork cutlets in between, covering with other half of parchment. Pound out using a meat tenderizer. If you do not have a tenderizer, grab a heavy pan and use the bottom side to pound out the meat. Pound, starting at the middle of each pork cutlet, moving out to the edges, until you have a uniform thickness of just under 1/4 inch. I know this sounds too thin, but go with it! It will cook quickly, will be tender and will not be too dry or thin once cooked! Set aside on a plate.
You will need 3 containers to contain seasoned flour, beaten egg and seasoned panko break crumbs. Set out your containers. In the first, combine flour with 2 tsp of the salt and 2 tsp of black pepper. Beat the 2 eggs into the second container, being sure to beat until it is fully combined. Put the remaining salt and pepper in with the Panko crumbs and toss to combine.
Dredge the pork cutlets in the flour on both sides, shaking off excess. Place into the egg container and fully coat both sides. Again, shake to ensure there is no excess egg remaining on the pork. Press into the plate of panko and then turn over and press backside to ensure a fully coated cutlet on both sides. Transfer to a plate. Continue for all of the cutlets. Set aside. If you are needing some time before heating the oil to fry the cutlets (I sometimes want to clean up the kitchen a bit before moving to the next step, as example), put the plated, coated cutlets into the refrigerator while you prep.
Breaded pork cutlets
Heat a large frying pan on med-high heat with 1/4 cup of grapeseeed oil. When oil is shimmering, begin placing the cutlets into the pan. These are so thin, they will cook in mere minutes, so do not walk away. Once you check the bottom side and it is fully browned and deliciously crispy looking, turn over. Fry 1-2 more minutes. Pull out the pork shnitzel cutlets once both sides are browned and place onto a cooling rack. Cook in batches, in order to not crowd the pan. If after the first batch, you need to add more oil, remove the pan from the heat, use an old rag and carefully wipe out the remaining oil and crumbs into the sink. Add new oil, wait until hot and start again!
When all are done, place the cooling rack on a sheet pan and let sit in a 275 degree F oven, while you cook some of my other German specialties, such as Red Cabbage and Squash or Spaetzle.
This recipe is one that I have dreamt about doing for years! I have had Spaetzle in Switzerland, Germany, Austria and France, and it has NEVER disappointed me. I will admit, I was a bit intimidated to try making my own Spaetzle, but with an assist from my husband, John, it turned out pretty amazing!!
Spaetzle is actually a pretty simple side dish. It is a dough that is torn into small pieces, boiled in salted water and then either served directly, or dried and then sauteed in a hot pan with butter to borwn the outside and make it even more delicious!
Tools required
Large pot to boil water. The spaetzle pieces will rise to the top of the pan when cooked, so you want a pan that has some diameter and room
A spaetzle maker, such as this one. Most commonly, you can use a stainless steel hand grater to push the dough through into the boiling water, if you do not have a spaetzle maker (I am not sure who does have one!). A hand grater is something used in most kitchens and is what I use. A good example would be this hand held grater.
Note/Tip: The key to using the hand held grater is to press the dough through the flat side of the grater, scraping the dough pieces as they come through the back, into the boiling salted water. Honestly, this is really a 2 person job. I would not have been able to do it without my husband, John. One person can scrape the dough through the grater, and the other to use a knife on the backside to release the dough, as well as use a strainer or spider to pull the cooked noodles out of the water as they are ready.
A hand held spider or mesh strainer
Ingredients
2.25 cups of all purpose flour
1.5 tsp. fine sea salt
4 eggs
6 Tbsp. reduced fat milk (not skim)
Instruction
Set a very large dutch oven or other large vessel on the stove on high with 4 quarts of water and 2-3 tbsp of kosher salt
Combine all ingredients in a large bowl or into your mixer. Mix until fully combined. If the batter is too wet to pick up with your hands, add more flour until it is a workable dough that you are able to hold and manage. Do not overwork!!
Once dough is ready, cut into quarters and push through the backside/flat side of your grater, directly into the boiling water, one quarter at a time, removing the cooked spaetzle as it rises to the top of the water with your spider/strainer
Serving
Serve spaetzle hot, directly after draining, or, allow to cool a few minutes and sautee in butter in a pan, to allow for some delicious, amazing browning on the outside!
I served this spaetzle with my recipe for Pork Schnitzle, but I could see this being served with pork chops, pork loin, steak tips, for a breakfast with something sweet! There are so many options!! Make double the recipe and store some in the freezer safely for a few months to add a little European flair to your future recipes.
I love looking for recipes that are both tasty as well as, at least somewhat, healthy. And with summer in swing, using ingredients that are in season is also a win. These strawberry yogurt pops are a great treat. They make use of the many deals on strawberries at the markets now, are not too sweet, and can be altered to your taste.
Required Tools
To make these pops, you will need a popsicle mold such as this one from Tovolo. Some molds require the addition of popsicle sticks, while others come as a full kit with tops that already have the handle built into the kit. If you are buying, I do recommend the ease of the latter!
You will also need a blender or food processor
Simple Ingredients
2 Cups Strawberries
3 Tablespoons Agave Nectar (or honey if you do not have agave on hand)
2 Cups of lowfat Greek strained yogurt
Instruction
Add strawberries to food processor and process until smooth. Add in the Agave (or honey), and pulse only a few times to combine.
Pour into large bowl and gently blend in the yogurt. This recipe calls for 2 cups of yogurt. Greek yogurt is a bit tart, so add 1-1.5 cups of the yogurt and taste. This is where your preference comes into play. I prefer a little less sweetness, so use the entire 2 cups. Adjust to use the amount that suits you or your family.
Pour into popsicle molds and freeze for 4-6 hours. Note that you will need to run the individual molds under water to get the pop out and enjoy!
Substitutions
You can use just about any fruit that suits your fancy! Banana, blueberry, peach or raspberry would be great options!
I always have mint on hand, whether in plant form in summer, or in the refrigerator in winter. Strawberry and mint is like pork chops and apple sauce in my mind! I love the idea of pulsing in a small handfull with the strawberries before combining with the yogurt. This is on my list for the next batch that I make!
If you like this recipe, try my recipe for frozen bananas! YUM!
My husband and I spend a lot of time in the Lakes Region of New Hampshire. There is a seasonal restaurant called Inn Kitchen and Bar located at the Squam Lake Inn in Holderness, NH. It took years of us visiting the area before we finally bucked up, made the ride and reservation.
If you are in the area, I highly recommend giving this place a go! It is an old house, converted to beautuful inn and restaurant. The bar is inviting and the indoor seating cozy, but modern. There is also a lot of outdoor seating, but the indoor was so quaint, any return visit we made was either at the bar or at a table in the bar area.
The menu is small, but powerful. I was surprised when my husband, of all things, decided to start with the beet hummus that was on the menu on our first visit. I rolled with it and am so glad that I did! It was amazing! If you love hummus, which we both do, the addition of the beets adds just enough sweetness to make this a somewhat obnoxious step sister to your usual lemon hummus. You know, the one that is a little too high spirited, but loved, nonetheless for her spunk and ability to stand out!
Anyhow, I got home and got down to figuring out how to make this something that we could enjoy at home, when the ride to Holderness, NH might not be in the cards for us. I think I have nailed this one. Perhaps not the exact recipe, but one that I can definitely live with and am proud of!
The glory of this recipe is that it is fast and easy. The longest bit of work is waiting for it to chill in the refirgerator. I looked at many recipes trying to get to one I liked, most of which called for roasting beets and waiting for them to cool before using. I have skipped all of that nonsense and used canned beets, that can be used directly into your food processer. Food hack for the win!
Ingredients
1/2 of a 15 oz. can of whole beets drained, 1 15.5 oz. can of chickpeas drained, 1 lemon zested and juiced, 1-2 fairly large garlic cloves, 2 tsp, cumin, 1 tsp. black pepper, 2 tsp. kosher salt, 3 heap Tbsp. of tahini. 1/4 – 1/3 cup olive oil.
Instruction
This is as simple as it gets! Add all ingredients, with the exception of the olive oil into a food processor. Pulse until smooth, stopping to use a silicone spatula to scrape down sides of the processer to make sure all is getting incorporated. If you are not getting a smooth consistency, taste and then add either more lemon juice or more tahini, pulse and check for consistency and taste. Once mostly smooth, pulse while drizzing in the olive oil. Add until fully smooth and incorporated. You can use more or less, based on your taste. I tend to add only what I need to get the thin/thickness that I like.
Chill before serving
Once you have tasted and seasoned to your liking, let the hummus cool in the refrigerator for an hour before serving.
Toppings
I like to serve out what we will be eating for a particular meal and top only that amount. Cover the rest to be saved in the refrigerator topping only when being served. My favorite accompaniments would be Zaatar Spice, Sumac Spice, Olive oil and toasted pine nuts. All can be found at most grocers, or ordered online.
To serve
This beet hummus goes with just about any bread, vegetable or meal! I like to serve with carrot and cucumber sticks, pita bread, crispy crackers, definitely red onion and any charcuterie or pickles/cornichons that you have at hand! Have fun with it!! This beet hummus can definitely be the centerpiece of any appetizer board for entertaining.
If you like this recipe, you might also like my recipe for Dilly, Minty tzaziki!
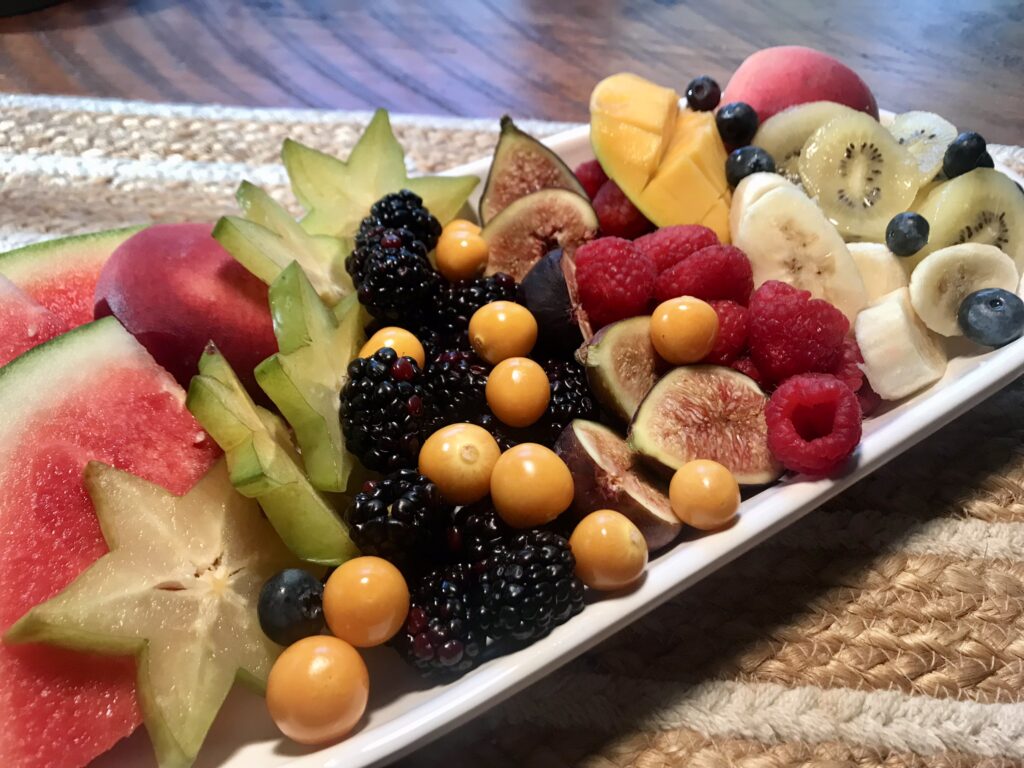
In the summer, I am always looking for recipes that will leverage all of the fruit that is in season. I was never one for baking, but over this past year, I have become obsessed with finding recipes that are not only a little bit of a challenge for me, but taste and look amazing. This recipe for Angel Food Cake was fun to make, goes great with just about any fruit you have in the house and was definitely husband approved!
One of my go to resources in the kitchen is the America’s Test Kitchen website. There are endless recipes, helpful hints and reviews of kitchen gadgets (another one of my obsessions). They have multiple versions of Angel Food Cake, of which this recipe is a bit of a simple spinoff.
Required Tools
Food Processor
Mixer
Angel Food Cake Pan (tube pan)
Rubber Spatula
Sifter
I used a food processor, as well as a mixer, but a blender and/or hand mixer could be substituted in. A fine mesh sieve can be used in place of the sifter.
There are only 6 core ingredients in this recipe, making it quite manageable.
1.5 tsp Almond Extract (you can substitute Vanilla, if desired)
Optional Ingredients
Any type of berry, banana, or other fruit, confectioners sugar for dusting, whipped cream or mascarpone to top
Instruction
Preheat oven to 325 degrees F. Set rack to middle position in oven
Using a food processor or blender, pulse all of the sugar until it is a very fine consistency. Remove 1 cup of the sugar from processor and set aside
Add the salt and flour to the processor and pulse only until combined
Add the egg whites and cream of tartar to mixing bowl. Set mixer to medium high and slowly incorporate the 1 cup of sugar that you had set aside. Mix until you have soft peaks. This should take about 5 mins. Feel free to stop and check the mixing attachment to ensure you are not over mixing. Once you have soft peaks, add in the Almond Extract and mix for only the seconds it requires to be completely distributed
Here is where you need some patience. To avoid creating a dense Angel Food Cake, sift the flour mixture into the egg mixture very slowly, using your spatula to fold in the dry ingredients. Slowly work out any pockets of flour, but the name of the game it to not overwork the batter and work slowly getting it combined
Once batter is ready, pour into ungreased Angel Food Cake pan. Use spatula to lightly spready out the batter evenly
Bake for 40-50 mins, beginning to check for a golden brown top at the 40 min mark. The top should feel springy to the touch
Invert cake, in the mold, upside down onto a cooling rack and allow to cool in the mold for 2 hours. Once cooled, carefully run an icing spatula (if you have it) around edge of cake to release cake, with the bottom of pan from main part of pan. If you do not have an icing spatula, a flexible knife will do the trick. Carefully remove the bottom of pan and turn cake over, bottom side up on your platter.
Finish with confectioners sugar and fruit, as desired!
Recipe for Homemade Whipped Cream
Ingredients – 1/2 Cup Heavy Cream, 1 Tablespoon confectioners sugar, 1/2 tsp pure almond extract
Instruction – Using stand mixer, hand mixer or a bit of resilience and a hand whisk, add all ingredients into bowl and whisk until peaks are smooth and the consistency looks like you would serve it. If using a stand mixer, be sure to pay attention to ensure you do not over whisk. Whipped Cream can be stored for up to a day in the refrigerator in a tightly covered container
Tips
Do not skimp on the Almond Extract. Only use pure
When separating the egg whites from the yolks, use a separate bowl and separate each on its’ own, before adding to the rest of the whites. This is to ensure there is NO yolk in the mixture of whites. If some yolk does get into your whites, use a shell half to fish it out and remove
If you decide to use Vanilla, rather than Almond Extract, also adjust the recipe for whipped cream to also use
Do not substitute in flours other than Cake Flour
Be sure to use an Angel Food Cake pan, and not a Bundt Cake pan. It will be too difficult to get the Angel Food Cake to release
With 3 days on your hands in Charleston, there are so many options for amazing things to do, see and EAT! I am a huge fan of not packing any schedule so tight that there is no relaxation, so will stick with making each day count, but with enough time to slow down and savor the city! So, mainly sticking to the main parts of town.
Where to stay?
I am a huge fan of staying in the Canonborough area of the city. It is a central location with plenty to do and see. There are many quaint restaurants tucked down side streets, as well as the many shops, cafes and restaurants heading both north and south on King St. (main road running north to south through the city). There are 2 hotels that we have had luck with, the Hyatt Place and 583 King St. , which is a Bluegreen Vacations resort, but can be booked via AirBnB most of the time. Provided the link has not expired, here is an example of the hotel listing on the AirBnB site. Both of those hotels offer rooms with kitchenettes, so if you are a fan of coffee and light breakfast before leaving the hotel, it is an option.
Speaking of AirBnB, we have also rented 4 times with them in the Canonborough area with great success. Once with our pup, once with friends and 2 other times just me and the husband. Stay Duvet is also a property management company and great resource, renting well managed apartments in the Charleston area.
Pics of Bluebreen – 583 King
What to Do? – Plan of attack
If you read my Charleston 1 Day Itinerary, you know that I am always a proponent of a city tour, such as this one if you are a first time visitor. If you are visiting during the summer (think..HOT), there are also enclosed bus tours to ensure you are getting some time out of the heat while riding. There is something to be said for getting your bearings, allowing an expert tour guide provide history and interesting facts providing you a better grip on those places and things that you saw that you know you would like to get back to to do more exploring.
I also recommend that for Day 1 of your stay in Charleston, you stick with those recommendations made in the 1 day itinerary linked above. It is aimed at giving my “do not miss” spots, which holds true even with a couple more days on your hands.
With 2 more days, there is the opportunity to tailor your activities to the type of weather you have, as well as specific types of sights you prefer etc. As well, you can fit in MORE of my favorite restaurants mentioned in the 1 day itinerary! I do recommend spending 2 of your days enjoying the core of Charleston, and 1 of your days getting to one of the many places of interest a bit outside of downtown or the northern end of King. If you have a car, you are good to go. If not, most of these recommendations can be reached via organized tour, such as those you can find on Viator. If you are feeling splurgy, there are also options for private or custom tours. Another interesting option is checking out the site called “Tours by Locals“, where you can find local tour guides, many certified, that can be hired directly to help you customize your time/tour.
Outside of the city
For the beach lover – you cannot beat Sullivan’s Island for a few hours of strolling the sand, enjoying the waves and getting yourself a great cocktail and breakfast, lunch or dinner. From downtown Charleston, the ride is about 20 mins over the Ravenal Bridge, providing a view of the Patriots Point Naval Port and Museum. Parking and other detail can be found on the Visitor’s site here.
Lunch or weekend brunch – You cannot miss a meal at The Obstinate Daughter if you make your way to Sullivan’s. Pizza, pasta, small plates and their Raw Bar are the focus of the menu. I have had a little of everything there and nothing disappoints in terms of food, service and atmosphere!
Dinner – The Obstinate Daughter also serves dinner. Another option would be Longboard. I ordered a whole local fish with posole rojo, hominy and corn and it was amazing!
Drinks and Snacks – Poe’s Tavern is the local watering hole and perfectly fits the bill. The front side of the bar is open to the street, so perfect for a beautiful day.
For the history lover – I recommend seeing at least Drayton Hall. Driving up the long drive, you can just imagine the days when the plantation was thriving. The grounds are beautiful, backing up to the Ashley River, with a variety of enchanting trees and plants. The human and botanical history is rich and the tour worth taking of both the grounds and the house. If you want to make a day of touring, just down the road, you can also visit Magnolia Plantation or Middleton Place. Both are within 10 mins drive from Drayton, have historical signifigance and amazing gardens to enjoy.
For the Museum lover (or a rainy day!) – You cannot beat the Charleston Museum for a super hot or a rainy day. Get out of the elements and enjoy America’s first museum! There is something here for everyone, but most importantly, it tells the story of the South Carolina low country. If you buy your ticket, be sure to get the 3 site ticket, which includes the Joseph Manigault House, as well as the Heyward-Washington House, both sites that are worth your time to visit.
Day 3
One of the benefits of having a car, or a bicycle while in Charleston, is the ability to explore the northern part of the city. North of Spring Street, there are so many newer (say within the last 10 years) restaurants, shops and cafes. I absolutely recommend renting a bike and heading north. If you are not into bicycling, hop in the car or work with the local pedicab company or Uber to arrange for rides between stops.
Travel Tip coming at you: If you own bicycles and are traveling most major airlines, you can purchase a bike bag such as this one and travel with your bicycles in standard baggage check. You will want to call ahead to ensure there is space and that the size/type of bag is accepted. We fly Delta and have not had an issue getting our bicycles checked in, so we are ready to hit the ground running when we arrive in Charleston!
If you are not traveling with your bike, you can hit Bilda Bike, to rent for the day. Get on your seat and head north! My husband and I tend to pack in as many amazing meals and coffees as possible when in Charleston. So, full disclosure…this Day 3 is about walking/riding and eating!
Grab yourself a coffee at The Daily to get your day started. Pop into Wynsum Antiques & Interiors to look through the amazing array of art, furniture and antiques. This place is truly amazing, if even just browsing. Head over to Lewis BBQ for lunch. My tip here: If you are in the sandwich game, rather than the full meal, skip the line and head directly to the bar. You can order directly from the bartender and enjoy one of the city’s best brisket or pulled pork sandwiches, along with a nice cold beer!
From Lewis BBQ, you can walk over and check out Butcher and Bee or Edmund’s Oast, for an outdoor seat and a cool refreshing drink or cocktail. Note that both of these restaurants are great suggestions, if you are not wanting BBQ. Wind your way back south and hit Leon’s Fine Poultry and Oyster Shop. Here, you can get anything from Oyster shooters to fried chicken, to an amazing whole roasted fish. Not up for a meal yet, no problem, they have an amazing atmosphere inside and out for just hanging out and chilling with a drink in hand. This is an old service station converted to restaurant and bar. It is unmatched for creative vibe and is lively at all times of the day.
For Dinner
If you have not hit all of the reaturants mentioned in the 1 Day Itinerary, I can recommend a few more located close to the 583 King Street area.
For seafood – Chubby Fish – This restaurant does not take reservations, so plan to be there when they open or close to when they will close. Their seafood is unmatched and the atmosphere is amazing! Go for the whole fish…you will not be disappointed!!
For a menu that will suit everyone – Vern’s – This place came out of nowhere for us. We were visiting Charleston for about the 8th time and this restaurant was mentioned to us by a number of bartenders and others we came across. It was lauded as the new and very well loved place to be. We had to book and…wow..it knocked our socks off! We had the sourdough bread with Allium Butter, bitter lettuce with garlic confit, and chicken with brown butter jus. Just a perfect meal. Yum!
If you have not found what you want, in terms of food, in this post, check out Eater’s list of places not to miss in Charleston here!!
If you have any comments or questions, please reach out to me at any time. I am happy to provide recommendations or help with planning! watchusdostuff.com!
If you have read any of my former posts about my amazing uncovering of a book of poems that I wrote as a ~8 year old kid, you should understand the hilarity and…well, embarrassing element of me disclosing them. Former posts about Thanksgiving and Dew Drops and Butterflies show a side of my inner child that, quite honestly, is really fun to look back on.
On this holiday weekend, I wanted to share yet another, masterfully written poem. It is entitled, “The Fourth of July”. What makes this poem particularly fun for me to read now, is the contrast in mindset, child to adult, regarding guns.
Don’t get me wrong…I have been to shooting ranges and gun clubs. I have shot many a rifle, handgun and automatic in my 50 years. However, I am not a gun toter. At the fear of disclosing this and having us taken under attack, we are not “gun” people in my house. Note, that I can weild a knife with the best of them! However, apparently, at 8 years old, my schooling taught me well that our 2nd amendment was something to hold dear. Oh my! hahaha!!
This is the absolute simplest of summer treat recipes, and it is actually quite healthy. Frozen bananas are covered with dark chocolate and rolled in nuts, for a cold, sweet, bitter and crunchy treat. They have it all!
Simple Ingredients
2-3 large bananas, 1 tbsp. peanut or almond butter, 1/4 cup dark chocolate (chips or broken bar, for melting), 1/2 cup chopped walnuts, 4 wooden craft sticks
Instruction
Cut bananas in half. Insert the stick into the cut part of the banana, ensuring it is in about half of the length. Freeze bananas on a tray for 3-5 hours. Melt chocolate and peanut butter in double burner. Stir to combine until completely smooth. Remove from heat. Note: the double burner is a pan of boiling water with a bowl placed over that has no contact with the water. The chocolate is then melted slowly in the bowl and not over direct heat. For this recipe, you will want a rather large bowl in order to be able to roll the bananas in the chocolate, once melted
Here is where you need to work quick. Have your nuts spread on a large and shallow enough plate that you can roll the banana, with the stick into the nuts. Roll each banana into the chocolate and VERY quickly into the nuts. If you work too slowly, the chocolate will harden and nuts will not stick
Freeze until nuts and chocolate are completely set on the bananas, roughly another 1 hour. Then, ENJOY!
Follow:
Subscribe to see our latest food, travel and home life updates by entering your email info below