Split turkey breast is one of those items that, when I see it, I buy it. It is not always readily available , so I jump on it when I can. What is a split turkey breast, you ask.. Basically, the breast portion of a turkey is split into 2, typically sold bone-in and skin on. Most nights I am feeding only myself and my husband, John. To cook an entire turkey would be a bit of madness. But a 2.5 – 4 pound bone-in breast of turkey is perfect!
This recipe uses an herb spread that is put under the skin and very simple spices that form an amazing crust on the outer skin. Pair this with my go to vegetable tray bake for a delicious meal!
Ingredients
2.5 – 4 pound split turkey breast
3 Tbsp. butter
2 Tbsp. grapeseed or olive oil
2 Tbsp. chopped fresh parsley
2 Tbsp. dried rosemary divided
2 Tbsp. dried thyme divided
2 tsp. each kosher salt and coarse back pepper divided
Instruction
Preheat oven to 350 F.
Pat split turkey breast dry on all sides. Loosen skin, ensuring to not completely remove it. Mix the oil, butter, fresh parsley and 1 Tbsp. each of the rosemary and thyme, until fully combined. Rub under the skin, making sure to pull the skin fully back over the breast.
Mix remaining rosemary, thyme, salt and pepper. Sprinkle over the breast, as well as on backside bone. If you run short of spice to coat completely, simply add a bit more salt and pepper.
Roast on middle rack for 20 mins per pound. Begin checking the temp at thickest part of the breast at 40 mins. When temp reached 160 degrees, remove turkey from oven to cutting board and allow to rest 15-20 mins. You should have a beautifully browned skin on the outside and amazingly moist meat on the inside. Delicious!
There are some recipes that are so flexible and easy, that I go back to them quite consistently. This recipe is exactly that. A mixed tray of vegetables that are oven roasted with oil and spices. Because you can use just about any hearty vegetable for this recipe, it is a great “use what you have on hand” type of recipe
This vegetable recipe requires only a few turns with a spatula while cooking, so you are free to prepare other dishes while they are doing their thing. Although simple, there are a few key tips that take this simple side dish from good to great
Tips
For this specific recipe, I recommend heartier vegetables. Root vegetables are great options, as well as cauliflower, broccoli, brussels, or any winter squash
In order to allow all of the veg to cook roughly evenly, you will want to cut heartier veg to a smaller size and leave those, such as broccoli, a little bit bigger. This is not one to sweat though, any of the above mentioned veggies will be slightly more or less roasted and it is all good in the end
Occasionally toss in something that you would not usually think of roasting, such as red radish, daikon radish, celery root, jicama, or parsnip. Even some hearty fruits can be amazing. Think bosc pears or honeycrisp apples
Slice a garlic bulb in half, leaving a flat surface to place face down in roasting pan. When vegetables are done, garlic will be super soft and squeezable and can be served separately and added by each eater at your table as they desire
Instruction
Chop roughly 2 lbs. of varied vegetables. This should just fit into a standard baking tray. The more colorful, the better. This can really have wow factor on a platter on your table! Wash and dry as well as you can. This is where a salad spinner comes in handy.
Toss on tray with 1/4-1/2 cup of grapeseed or vegetable oil. Use just as much as needed to have a glossy coating over all veg. Sprinkle with kosher salt, pepper and rosemary. Add a few dashes of red wine vinegar and put into a preheated 400 F oven. Begin turning the veg occasionally once they have been in for 15 mins. They should be roasted nicely, with nice browning in 40 mins, but do a fork through the veg check each time you turn them.
Taste and add additional salt and pepper, to taste, as well as a drizzle over of extra virgin olive oil. Voila!
Note: I always make more vegetables than my husband and I can use in one sitting. I reheat in a sauté pan, or put under the broiler for a few mins to bring them back to life! Also, there are many alternatives, such as swapping out rosemary and thyme for togarashi or garam masala spice. Using a drizzle of lemon, rather than red wine vinegar. Have some fun with it!
Some nights I am content to spend a couple hours in the kitchen, challenging myself with new recipes or ingredients. Other nights, I want something interesting, but simple. This is that kind of a meal. Chinese sausages are charred in the oven and served with soba noodles and a crisp salad. These sausages were not something that I typically buy. I have seen a number of cooking shows making use of them, so when I came across them in the grocery, I decided to give them a go and create an easy charred Chinese sausage meal.
Ingredients
5 Store bought Chinese sausages, such as these pork sausages found at the local Hannaford. I am guessing there are many brands of varied qualities out there, but this is what was at hand
2.5 – 3 ounce of Soba noodles, such as these, found in our local Hannaford
Mixed green salad of your choice. Do include radishes in your salad! The crisp and spicy kick they give, goes incredibly well with the sweet sausage
2 scallions, chopped – green and whites
For the dressing:
6 Tbsp. grapeseed oil (or olive, if you prefer)
3 Tbsp. rice vinegar
1 Tbsp. honey (substitute in sugar, if no honey on hand)
1 Tbsp. mirin
3 Tsp. low sodium soy sauce
Instruction
The glory of this recipe is the simplicity and how quickly it comes together. Heat oven to 350 F. Put sausages in greased oven safe pan (preferably cast iron) and put into oven. After 15-20 mins, turn sausages. They should be charring nicely, with a crisp outer skin. Bake another 15-20 mins until cooked through (160 F for internal temp). Cooking sausage in the oven was a revelation for me some years ago. I love the charred exterior that you get, as well as the fact that the cook top evades the typical splatter factor!
While the sausages are cooking away, follow instructions on Soba package. Drain and set aside noodles. Assemble salad. Plate both salad and noodles. Put all dressing ingredients in a jar and shake vigorously. Taste and adjust to your liking. I prefer a little less vinegar and a bit salty sweet, but tinker until it is perfect for your taste. Dress the noodles and salad and add sausages over the noodles.
Why I loved this recipe
I knew to expect these Chinese sausages to be on the sweet side. The sweetness paired perfectly with the crunch of the salad and the punch of the Asian dressing. It literally hit all notes…sweet, salty, spicy, sour! The soba adds that last perfect bit of nutty, earthy flavor.
This recipe could be tweaked to use crunchy cabbage and carrots for a slaw, rather than salad, or Udon, rice or other noodles to mix it up. So many options! This one will be on my easy weeknight meal repertoire from here on out!
It is weekend and we are blessed with amazing weather. These kinds of days are made for grilling. Low effort, chill on the deck, pups in the yard, drink in the hand kind of cooking! And what says easy grilling, like a rotisserie chicken that, once rubbed and tines are set, you can let spin its way to juicy deliciousness?!
Note that this recipe assumes that you have a rotisserie grill attachment. I put off buying this for years and finally gave in last year. It has proven to be an awesome tool to have, so I have no regrets with the purchase. We went for the NexGrill Universal Rotisserie kit from Home Depot. We have had a Nexgrill for years, and despite the low cost and it being a big box store grill, we have been super pleased with both the grill and all attachments purchased.
The first step to getting your chicken going is deciding what type of rub you want. Here, you are open to doing as little or as much work as you want. If you have a favorite dry rub that you purchase and love, run with it! I typically have a few homemade and a few store bought spice mixes on hand, so I can run with my whimsy on any day. Cavender’s Greek seasoning is super tasty and Goya has a seasoning for every taste as well. But, it is easy to whip up a batch of rub and keep what is not used in a mason jar, so next time, the work is already done!
Quick Chicken/Pork Rub Recipe
1 Tbsp. each of Garlic Powder, Onion Powder, Sweet Paprika, Brown Sugar
1 Tsp, each of cinnamon, pepper (fresh ground preferably) and salt
This is enough for roughly a 4 lb. chicken. Double, triple or quadruple the recipe to keep some in the cabinet for other recipes. I use this both for pork and chicken, so it does not go to waste!
Prepping the chicken
Grab a baking sheet with shallow sides that will fit into your grill. This will be your work surface for prepping the chicken, as well as the base under the chicken while on the grill. After patting the chicken completely dry, tuck the wings under the body, spice the inside of the bird with your rub and tie the legs tightly together with kitchen twine to get the legs nice and tight against the bird. Some will say you need to truss the chicken in, what I consider, an expert way, but getting the legs tight against the body is enough. Insert the rotisserie tines from both ends, positioning to get the best grip on the chicken. This can take some time and maneuvering. Once nice and tight, tighten the screws to secure the prongs in place.
Generously rub the chicken all over with spice rub. Make sure to get into creases of the legs and wings and full coverage, back and front. You are ready to go!! Put the rotisserie rod into the rotator attachment and start it up!
Cooking
This is the bit that can get a little tricky. Every grill has its’ own personality. Some burn hot and some are shy. In general, you want to keep the temp at about 400 degrees. I recommend starting with all burners on low and check what temp you get with the lid closed. If temp is spiking, turn 1-2 of the burners off completely to maintain steady heat. It is indirect heat, so which burners is less important than getting the temp in the 375-415 or so range. Once the chicken is on, melt 1/4 cup of butter with a 1/4 cup grapeseed or other high heat oil (I do not recommend olive oil). Once the chicken begins to form an outer crust and there is a little sizzle happening, begin basting occasionally.
For a 4 lb. bird, it will take about 60-90 mins total on the grill. The chicken is done when the middle of the breast is at 160-165 degree and thigh is 150-155 degrees F. Remove and let rest on rotisserie rod for 15-20 mins.
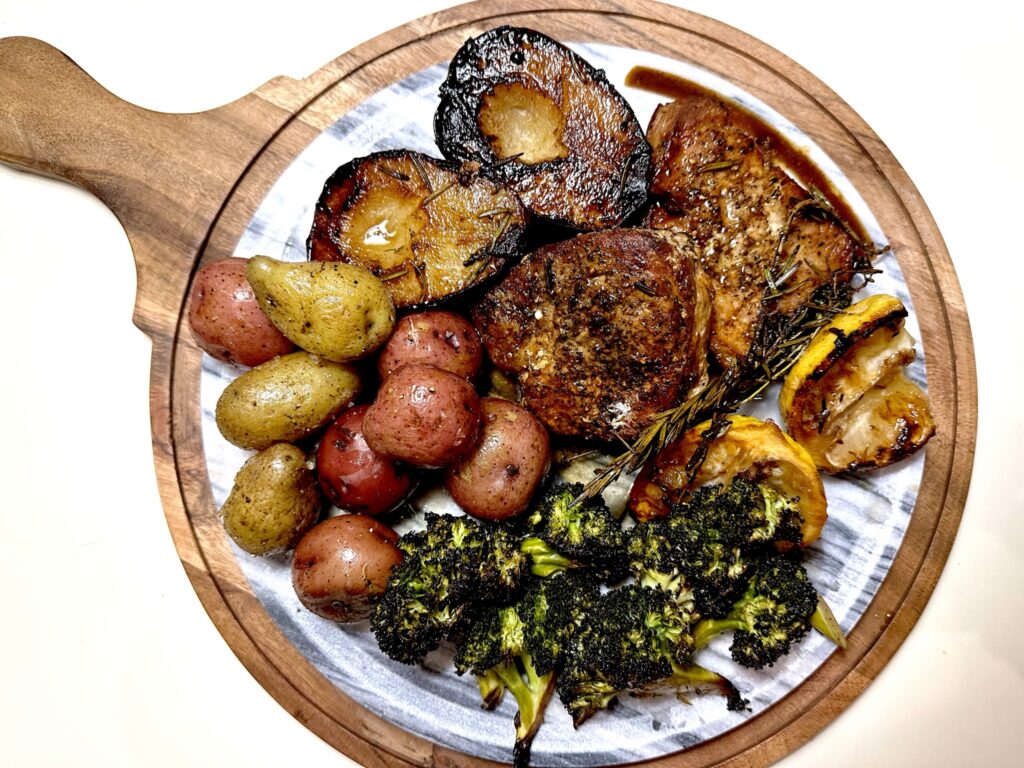
Serving
I served with roasted carrots and broccoli. You could also put sliced potatoes, sweet potatoes or onions in the roasting tray below the chicken to soak up the basting and chicken juices. I will warn though that you need to check the amount of clearance you have from the chicken to the tray, may need to add vegetable stock or more oil as you go, and watch for potential burning. However, if you have a juicy bird, these veggies are amazing!
If this recipe sounds good to you, you might like my recipe for weeknight pork loin with plantains and delicious veggies!
There is nothing better than a recipe that wows and ALSO proves to be incredibly easy. This recipe is both. Once you have gathered all of your ingredients, your slow cooker does the bulk of the work! One of the best parts is that the leftovers can be better than the initial recipe itself!
3.75 – 4 pound bone-in pork butt roast. We love the quality of the pork delivered from Crowd Cow
1 Red onion, cut into fairly large wedges
6-8 garlic cloves. In my house, more is always better!
1 Tbsp. kosher salt
2 Tsp. course ground pepper
1 Tbsp. dried oregano
2 Bay leaves
.75 cup Pineapple or Apple juice
.75 cup cola (made with cane sugar, rather than corn syrup, if you can find it). Coca Cola now has their old style cane sugar cola in the bottles!
Instruction
Here is the best part…the simplicity! Trim a bit of the fat cap off of the pork butt. There should be a significant amount left, but I find removing about 1/4 of the fat has best results. Score what is left of the fat cap and place roast into the crock pot fat cap to the side. Add balance of the ingredients, close and seal lid and set to low temp for 7.5 hours. Your job here is almost done!
Once the slow cooker is done, you should have an amazingly browned top and fall-apart roast sitting in some pretty amazing juices! Remove the roast to a cutting board and let rest for 15 or so mins. Using your hands, or 2 forks, pull the pork apart into chunks, leaving some chunks larger than others (this just makes the texture more interesting! Remove any excessive fat that is left, although most will have rendered into the juice that flavored the roast! Yum! Do not toss the juice just yet…
Transfer pork to very lightly oiled sheet pan and spread out. Pour some of the juice over top just to put moisture evenly. Crisp under the broiler just until crispy at edges and beautifully browned all over! If you intend to only use a portion of the pork right away, you can broil only what you will be serving and store the balance (with some of the juice) to broil or to pan fry at the point that you intend to use.
Serving
So…many…options. Tortillas, salsa, chopped onion, cilantro, diced tomato, salsa verde…sky is the limit! For this meal, I went simple with flour tortillas, some diced tomato, serrano chilis, leafy greens and cilantro. Leftovers this morning were super crisped in a pan and were as, if not more, delicious than the first go around!
If you like this recipe, you may also like my amazing recipe for Carne Asada lettuce wraps!! Give it a try!!
I love the broad variety and depth of flavors that you get from many of the ingredients used in Asian recipes. This authentic Pho (I say authentic, trusting the many recipes that I used to combine and create) is not for the staunch 5 ingredient fix fans (I am a fan there, as well, but sometimes love a more complicated challenge), but if you can work with a few more ingredients, this recipe pays its’ weight in gold! If you are a straight 5 ingredient type of cook, try Jamie Oliver’s 5 ingredient recipes for free on his site. You will not be disappointed, but you will not be making Pho! hahaha
Making use of the ingredients
I have had so many people mention to me that they do not want to test into these types of recipes because once they buy the ingredients, they just sit and go bad in the refrigerator or cabinet. To that, I say, look for more recipes that will excite you to use those ingredients up! Planning ahead is key.
My advice: if you are planning to buy x amount of new ingredients and you are not sure you will use them, dig around on Allrecipes or on another recipe app first, searching by ingredients. You will find other recipes with that some of the same ingredients to see if you may be able to re-use for something else. If nothing appeals to you…move on. You will find something else in your wheelhouse! If you can find 2-3 recipes you can make within the next 10 -20 days that use some of the same, new, exciting stuff you are buying, go for it! I am not about waste, so only buy, if you feel you will actually use!
Why try to cook Pho from scratch?
Well, why not? It is not something that you can get easily in the area that we live in in New Hampshire, so recreating something I tried in Boston, Amsterdam or some other cosmo city seems to make sense! What is better than a bowl of deliciously flavored broth, with rice noodles, vegetables and super thinly cut and very tender beef? Here is where I will put a disclaimer that this will, in no way, be a dish that can be converted to a vegetarian or vegan dish. The flavor and heart of this dish is in the flavor that you get out of the beef bones, collagen, marrow and all. And, if you are a beef eater, this is something that will have you smiling weirdly, smacking your lips, and even dancing…the sprinkler maybe or for those with more flexibility, perhaps there is a twerking session with noodle spoon in hand! Send pics please!!
Another disclaimer here…this recipe will take between 6-8 hours, based on how you decide to cook it. The time invested is worth it…stay with me on this one!!
Place the beef bones onto 1-2 baking sheets and roast for 1-2 hours, or until all show signs of the marrow being just about melted
With 45 mins left on the bone roast, place onion halves onto sheet and brush with oil. Continue to roast
Put both the bones and the onions into a large pot. Add the ginger, star anise, salt, fish sauce and water
Bring to a boil, then reduce and let simmer on lowest heat for 6-8 hours
Strain the broth in fine sieve
Place noodles in a large bowl and pour boiling kettle water over to cover. Let sit for 4 mins and then drain in a sieve. Rinse and set aside
Place noodles in bowls with the thinly sliced beef. Ladle the super hot broth over top and stir until thinly sliced beef is cooked through
Garnish with cilantro, green onion, hot chili pepper, hoisin, bean sprouts, sriracha and any other desired vegetable or condiment! Bok choy or thinly sliced savoy cabbage would be awesome as well!
If you cook, save this recipe and plan to wow a loved one. If you do not cook, send this to the one you want to cook for you and make their plan easier, by knowing what you want! Either way, ENJOY!
Note:
If you like this recipe, try my recipe for Vietnamese Caramel Chicken. This is something that will blow your wig off!!
Spring has sprung and I am enjoying all of the posts with folks using spring vegetables in their kitchens and getting into the dirt in their gardens. This is the best part of the spring in New Hampshire. Those weeks after the real “mud season” has passed and the weather is teasing the upcoming summer days!
Basil is the craze
I have been noticing a lot of posts out there having to do with basil; how to grow it, how to trim, and when to water it. Personally, I think this herb is used mostly as garnish, and that is a shame. It is a bigger, bad ass of an herb than that! In thinking on using basil in a bold way, I remembered a recipe for basil salad that I had seen months ago on a Nigella Lawson show, that I knew would be a hit with my husband, John. And it was! He loved it as much as I did!
If you do not follow Nigella on social media, take a look. She cooks simply, but turns out stunning food.
Check out this Instagram post about how to grow basil. This woman knows her stuff! Also, check out the author, @cookiterica, she has some amazing recipes and content!
About the recipe
The best thing about this recipe that you will not need to look up, search or commit it to the home recipe book. It is super simple and so flexible in the amount of ingredients, based on your own preference, that you can make it completely your own. Here is my take:
I have dozens of mason jars. I use them for everything. Storage of sugars, rice, spice mixes etc. Most every year, I can something, whether it is fruit jam or tomatillos to be used throughout the winter for salsa verde.
I have noticed lately that mason jars are being used not just for canning and jarring to store on the shelf, but also for fresh fruits and veg. The claim is that the produce keeps quite well, if washed, dried and then stored in the airtight mason jar.
The verdict:
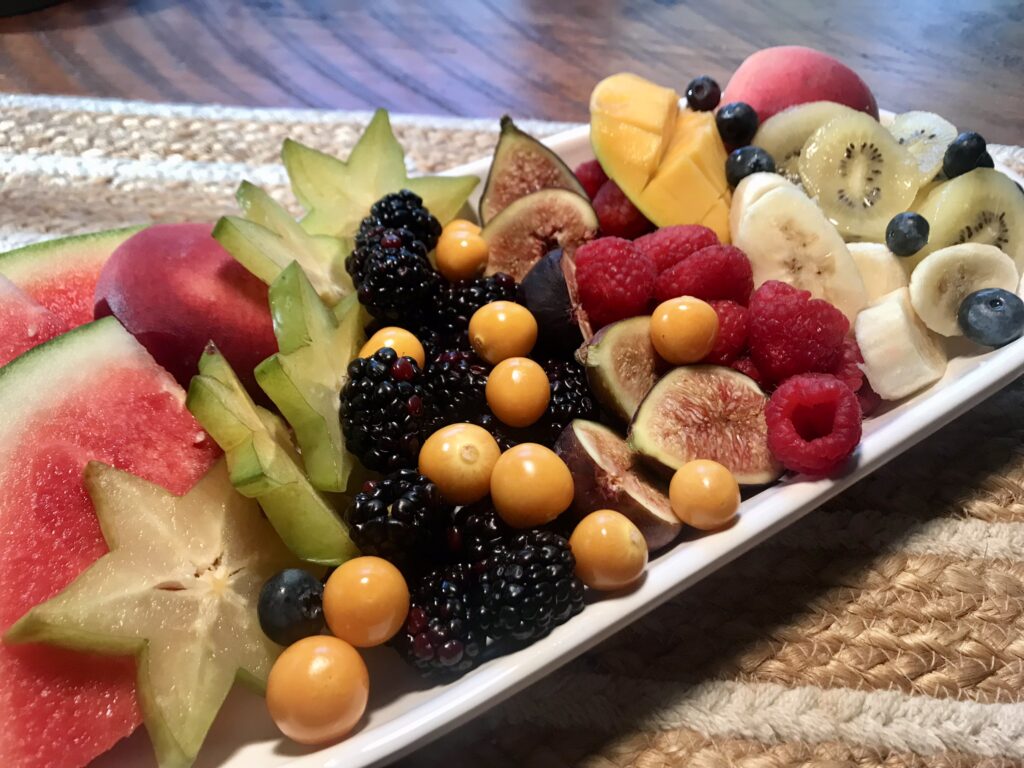
I have tested storing mason jar fruit and am 1.5 weeks in, ate a jar today (grapes, blackberries and strawberries) that was still fresh, with no sign of browning or mold growth. So, this food hack has my gold star! It appears to be completely legit! And, not only does the fruit stay fresh, but the presentation is amazing! I love the idea of grabbing the jar out of the refrigerator and grabbing a seat on the deck, fork in hand, with this beautifully colored sweet treat! I selected monotone colored fruit, but could imagine mandarins, gooseberries or other fruits adding absolute WOW factor! Give this hack ago!
If you like this hack, you may also like my post about making fruit trays pleasing to the eye here!
Over the years, I have had the pleasure of working with many colleagues from the country of Tunisia. Some of my best working experiences and friendships have this lovely country to thank. Tunisians, in my experience are authentic and persistent in the best of ways. They are passionate about their culture, and that of other North African countries, and fiercely proud of their food. Visiting Tunis in 2022, I was not surprised to be welcomed warmly and to enjoy every meal shared, both for the amazing food, but also the amazing company.
Ya Amna
Back in 2021, I went on a search to find a cookbook that would allow me to learn a bit more about Tunisian cooking. I stumbled on a book called Ya Amna, From Djerba to Israel. It is more than just a cookbook, but a story of a woman born in Djerba, a Tunisian island, who grows up in Israel. Her mother (Amna) manages to keep their Tunisian heritage alive by keeping the aromas and tastes of their Tunisian food ever present in their home. The book is a beautiful journey for its’ author and has been a challenge for me to try new dishes and flavors. Djerba has a rich history worth reading about, and is on my list of places to see, as I am told the best Tunisian food and beaches are on the island of Djerba.
What makes these stuffed peppers different?
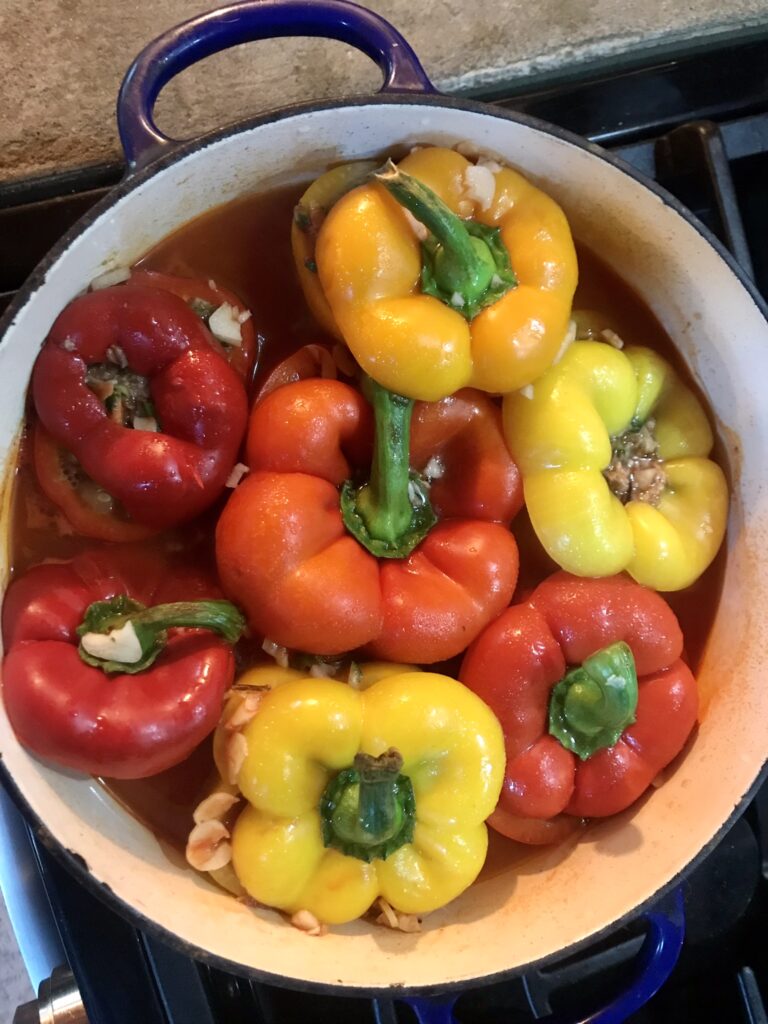
I have made stuffed peppers many, many times over the years. There is always rice and beef and some sort of tomato involved, baked in the oven. These peppers amp the flavor by using numerous vegetables, herbs and spices, and are cooked on the stovetop in a sauce. I was not sure about this method, but they came out amazing! I made a few recipe tweaks, but this will be my go-to stuffed pepper recipe for evermore!
1 bunch parsley and 1 bunch cilantro, finely chopped
1.2 bunch mint, finely chopped
1 lb. ground beef *(see note below)
1/2 tbsp. each, sweet paprika and cinnamon
1 Tbsp. salt
2 Tsp. black pepper
1/2 cup oil
2 tomatoes, diced
For the sauce
4 Tbsp. tomato paste
4 garlic cloves, sliced thinly
1 Tsp. salt
3 cups water + more, if needed
Instructions
Soak rice for 1 hour and drain
Combine carrots, zucchini, onion, herbs and tomato in large bowl. Add in the rice, beef, oil and spices and combine thoroughly, without overworking the mixture
Cut tops off the pepper, remove seeds and large veins from inside
Fill the pepper with rice/beef mixture, leaving 1/2 inch at top for expansion. Rest top of pepper back on top
Arrange peppers tightly in large pot
Prepare the sauce, by mixing last 4 ingredients and pour over the peppers. Add additional water, if necessary to just cover the peppers
Bring to a boil and then lower heat to a low simmer. Cook until most of the water has been absorbed and beef and rice mix is cooked through, roughly 45-60 mins
Tips
The original recipe called for 1/2 pound of beef. I upped this to a full pound, to get a beefier mixture. The recipe also called for 3/4 cup of oil, which I reduced to 1/2 cup with success. Add until you think the mixture looks homogenous.
I used 7 bell peppers, because that was all I could fit in the Dutch oven that I used. Recipe calls for 10 peppers. Note that once stuffed, because I used fewer peppers, and also added a 1/2 lb. more beef, I had mixture left. I put aside and used to stuff grape leaves on another day.
I used a food processor to “grate” the zucchini and carrot and then squeezed a lot of the moisture out before adding to the rest of the ingredients. Likewise, the onion and other herbs can be chopped in the processor together to make quick work of it.
I am not a super sweets fan, so when I go through the trouble to bake or make something sweet, I have great expectations! A couple months ago, I made a triple chocolate mousse cake that was an absolute stunner! Will share that in the coming days. After that recipe, what I was left with was a larger appreciation for the work that bakers and other cooks put into the perfecting of bakery items, but also a cabinet full of Dutch Cocoa, espresso powder, and various chocolate bars, not meant to be directly consumed, but cooked with. This led me to a search for a chocolatey recipe that would use my ingredients, challenge my skills and ultimately, make my husband happy. He has a true sweet tooth!
Behold, the Brownie
After digging through numerous cookbooks, I settled on what America’s Test Kitchen (ATK) calls “Chewy Brownies” and decided this was the recipe to tackle. Truth be told, I did not grow up a brownie fan, but after having ordered a brownie fudge sundae with friends at a local Irish Pub some years ago, I realized that there is something about a chewy brownie with some crunchy edge that cannot be matched. This recipe pulls out the stops, in that not only is it chewy with amazing crunch at the edges, but within, some of the chocolate is left as 1/2 inch chunks, lending some inner crunch. It is perfection!!
1.5 tsp espresso powder – this is optional, but I highly recommend
1/2 cup + 2 tbsp. boiling water
2 oz. unsweetened chocolate, chopped or shaved
4 tbsp. unsalted butter, melted
1/2 cup + 2 tbsp. vegetable oil
2 large eggs + 2 large egg yolks
2 tsp. vanilla extract
1.5 cups white sugar
1.75 cups all purpose flour
.75 tsp. salt
6 oz. bittersweet chocolate cut into 1/2 inch chunks
Instructions for Cooking
Preheat oven to 350 degrees F. Set the oven rack to the lowest position. The original ATK recipe indicates to use a 13 x 9 inch baking pan. I chose to use a a smaller glass pan, which was 11.5 x 8.5, because I wanted a little bit taller brownie in the end. Create a foil sling by setting foil in into the pan in both directions with at least a few inches of excess hanging over the edge of pan. This is in order to be able to lift the brownies out of the pan, once they out of oven. Push the foil into corners of pan firmly and grease liberally. You can do this easily with canola spray or baking spray, if you do not want to hassle with a stick of butter melting in your hands!
Whisk the cocoa and expresso powder and then pour in the boiling water. Whisk until combined. Add the unsweetened chocolate and whisk until it is fully melted. Add the butter and the oil, whisking while you go. Once fully combined, add the eggs and yolks, as well as vanilla. Note that my eggs were not what I would consider large, so I went ahead and added in an additional yolk.
Add in the sugar and whisk until fully combined. And in the salt and grab a rubber spatula. Begin slowly incorporating the flour until is is totally combined. Fold in the bittersweet chocolate pieces until spread throughout the batter. This is the magic bit of this recipe!!
Scrape the brownie batter into the prepared pan and get it into the oven. Original recipe indicates that the cook time will be 30-35 mins. Because my pan was glass (conducts heat really well) and the pan was smaller, creating a thicker brownie, my cook time was roughly 50 mins in the end. Be prepared to begin checking at 30 mins, either way, to ensure you do not overcook. You will be looking to insert a toothpick, not in the center, but about half between the edge and the middle, with only a bit of moist crumbs on the toothpick when removed.
Cooling
When brownies are done, lift brownies out using the foil sling and place on a wire rack. Let cool for 1 hour. Note that foil may appear to stick a bit to bottom of the brownies. Be patient and slowly peel the foil back. It will come away with no issue if managed carefully.
Serving
I love something creamy to cut the intense chocolatiness of these brownies. I opted for Talenti Coffee Chocolate Chip gelato and some berries!
Tips
As mentioned, I used a smaller pan to get a higher rise on the brownies. This takes a little bit of watch and see, as you need to make sure you check once you hit the 35 min mark (they will be undercooked at this point), to make sure you know how far you are from done and then check periodically until done.
It seems a bit scary putting the bittersweet in at the end in chunk form. If you are the type to not want chips in your ice cream or brownie, I would recommend shaving these more fine. Otherwise, these chunks, in my, and my husband John’s opinions, make this brownie damn remarkable! Moist, chewy, chunky and chocolaty!
Go for the Droste Cocoa Powder. It does not disappoint. I have spent years over the course of my life in the Netherlands and can bona fide recommend their chocolates as well! If you stumble on them, or are a chocolate fan, get an order in for those babies!
Follow:
Subscribe to see our latest food, travel and home life updates by entering your email info below