Puff pastry is one of those items that I keep in the freezer at all times. In a pinch, you can do all sorts of fun and yummy things with it. Think sweet, such as rolling up a cinnamon and nuts mixture for cinnamon rolls, or savory, such as this heirloom tomato Caprese Tart recipe. Spinach and feta, cream cheese and roasted tomatoes. Any and all combination of fruits or veggies that you and your family enjoy.
I use Pepperidge Farm frozen puff pastry sheets. They defrost quickly and puff up nice and flaky. They can be cut into any size or shape that you want, so there is potential for some crazy cute desserts. Fourth of July is around the corner. I could imagine cream puff stars would be pretty snazzy at your cookout! For this recipe, I went as straight forward as possible and used the entire sheet.
Ingredients:
1 large or 2 smaller heirloom tomatoes, 5-6 ounce fresh mozzarella, such as Galbani, 1 sheet puff pastry, 3 ounce shredded parmesan or asiago cheese, dried oregano, salt and pepper and some fresh basil leaves for serving
Simple Instruction
Defrost the pastry per the package instructions. Using a sharp knife, score the pastry about 1/2 inch from each side, careful not to cut all the way through. This will create a defined box for layering in the ingredients. Slice the mozzarella and the tomatoes into roughly 1/4 inch thick chunks. Pat both as dry as you can get them. Create an overlapping layer of tomato and mozzarella to cover the base of the Caprese Tart. Do not layer too heavily, to ensure the puff pastry will crisp up and not sog up on you.
Sprinkle oregano, salt and pepper over ingredients. Lastly, sprinkle the parm or asiago cheese over entire tart, allowing some to land on the 1/2 inch edge of the pastry. This will give a crunchy cheesy crust.
Cook in pre-heated 400 degree oven for 15-20 mins. Crust will be nicely browned and cheese will be bubbling! Let cool and eat!
An alternative ingredient tart
Cream cheese base with pre-roasted cherry tomatoes
I love Greek cuisine. Actually, I love anything Meditteranean, if I am going honest with you. Lots of fish, veg, good quality meats. In a new development….I actually have some interest in Lamb. This is something I would not have dreamt of eating even 5 years ago, but have put into recipes such as Kofta and kibbe. But, I am getting off track here…those recipes will make their way here soon enough!
This post is about a very simple something in the Greek cuisine that I fell in love with years ago when I visitied my sister, who was living in Athens at the time. It is tzaziki.
To boil it down, it is simply a strained yoghurt with a sort of mix of herbs, salt and almost always cucumber.
Handful of mint as well as handful of dill (this is really to your taste, so chop a bit, add, taste and adjust). I am a mint fan, so I go heavy with it! Leave out the tougher part of the dill stems. All herbs chopped super fine
1 Garlic clove, minced fine into the yogurt, preferably with a microplane, to make it almost liquid
1/4 of an English cucumber shredded and then squeezed in paper to remove as much liquid as possible
Kosher salt. Start with a teaspoon and adjust as you see fit!
Instruction
Combine yogurt, cucumber and garlic. Add half each of the herbs and then taste. Continue to add until you are satisfied with the amount of herby deliciousness. Add salt to taste and serve!
For me, nothing is better than a recipe that includes a number of ingredients that would be at the top of my “yes” list for things we love. This recipe for meat pie is one that I saw Joanna Gaines cook on her show, “Magnolia Table”. Her original recipe is here. I loved the story about her mother being Korean and her father being half Lebanese and half German. Food coming from all of these cultures are things I aspire to learn about and perfect in my kitchen, so this first episode that I happened to watch was a wonder for me!
One of the things that I liked about the recipe was the ability to cut some corners, if wanted, or make it all hand made, if time is on your side. I, of course, took some liberty and added my own twist and spices, but the core elements remain…meat, onion, cheese, potato and spice wrapped in a type of bread or biscuit. Come on….no one can argue that that does not sound amazing!
The available shortcuts
Like any meat pie or veggie pie, there is an outer layer, that is hopefully, crusty and delicious. You can make this crust from scratch, or you can take the short cut that I took away from the Magnolia Table recipe and use store bought biscuits. There are other cuts, such as buying frozen hash browns for the potato or pre-shredded cheese. I went scratch for these because I had the ingredients on hand and it would take only a little extra work to do it myself. However, as you look through ingredients, I will point out where you can cut corners to make this as quick and easy as you want.
2-3 ounce of shredded cheese, prefereably cheddar, but any good melting cheese will do, such as fontina, young gouda etc. This is about your taste and what makes you happy!
1 medium to large gold potato, shredded. I went old school and used a hand shredder, but here is where you can cut some corners. Use approx. 3/4 -1 cup of defrosted frozen hash browns, such as these from Target
3 Tbsp Zaatar spice. This is something you can find in your regular grocer. If you cannot find, no whoop. Spice this with your favorite herby spices
1 Tbsp. harissa spice – this is totally optional. I used one that I found locally, called Pride of Africa, Tunisian Harissa. It appears hot to the tongue, but once in food, it not hot at all. It just adds some mystery!
Salt and fresh ground pepper to your taste (roughly 2 tsp kosher salt and 1 tsp course pepper)
1 Tbsp. grapeseed or veggie oil
3 Tbsp. butter – melted
Instruction
This could not be a more simple and easy recipe, if you enjoy aquick weeknight meal!
Let biscuit roll sit on counter for 20-30 mins while you prep the cheese and onion
Chop onion into a fine dice. Set aside
Shred cheese and set aside in refrigerator. If using pre-shredded cheese, move to next step
Remove the biscuits from container, flour broad surface and roll out each biscuit until thin and about 8 inches in diameter. Do not get precious here, a little bigger or smaller is not going to make these meat pies any less delicious! And, if you do not have a rolling pin, grab a bottle of wine, booze or soda, wipe down with lysol or similar wipe (yes, I am a bit anal in this area), dry completely and then flour it up. Just as good as any rolling pin you could find!
Put the onion into a non stick or HexClad pan with oil . Once the onions are becoming translucent, add in the beef. Add in 2 Tbsp. of the Zaatar spice as well as the Tbsp. harissa spice. Stir and continue to break it up into small pieces as it cooks.
In separate bowl grate the potato. If using frozen hash brown, still use a side bowl and defrost. In both cases, squeeze the bulk of water out of the potatoes using a towel or a load of expensive paper towels (yeah, flexing my inner cheepy and saying that paper towels should be used sparingly…they are expensive and..well, a bit wasteful! IMHO).
Allow the beef/onion mix to cool and then add to the potato mix. Add in salt and pepper.
Preheat oven to 350 degrees
Separate the mix into 8 equal parts. Place into center of each rolled out biscuit and then fold up the bisciut over the mixture. Brush with butter and sprinkle top with remaining zaatar spice and salt to your taste
Bake for 30-40 mins on middle rack, checking in at about 25 mins to ensure they are not cooking or browning too quickly. Remove when browned and cutting through one shows a hot, delicious and steaming center!
Pork chops are a regular on the menu here at the Frias house. It is a rare occurrence that we do not have at least a couple packages in the freezer, waiting to be prepped for a weeknight meal. And what is better than pork with a sweet bourbon, cherry sauce? I daresay, nothing!!
We order kurobuta bone-in pork chops from a food delivery service called Crowd Cow. It is more expensive than running to the local grocery, but once we got a taste of these pork chops, they have remained a bit of a splurge. They are truly delicious!! The chops originate from a coalition of family farmers under the name True Story. In addition to being well marbled and tasty, they are also guaranteed to be humanely raised, which is always a good thing in my book. If you are a lover of a good pork chop, I 100% can recommend you check these babies out!
To brine or not to brine?
Brining is the infusion of salt and sugar into proteins in order to make them more tender and tastier, sometimes. This is achieved by dissolving salt and sugar into a liquid base, sometimes adding herbs or spices. Because these pork chops have beautiful marbling, they absolutely do not NEED to be brined. Simple seasoning will do the trick. However, I do brine on occasion, just to switch up the flavor profile. Also, if you order your meats from a company such as Crowd Cow or Butcher Box (also recommended), they come to you completely frozen. A trick that I use is to use the brine as a means to more quickly defrost the chops on the day that I want to cook them.
Because this recipe has bourbon and cherries to add natural sweetness, it would be perfect to simply season liberally with salt and pepper and save yourself some steps. If you decide to brine, my standby recipe for any pork chop, roast or loin can be found here below. If not, jump to the Ingredient list.
Simple Pork Brine
1 gallon cold water
1 cup kosher salt
1 cup white or light brown sugar
If desired:
1 cinnamon stick, snapped in half
Small handful of peppercorns
2 star anise
small handful or coriander and/or allspice seeds
Rosemary or Thyme sprigs
Instruction/Notes:
Add ingredients into large bowl. Cover and brine for 1hour in refrigerator, if not frozen. If frozen, expect 3-4 hours of brining time.
The above amounts will cover 4-6 pork chops, based on size. If cooking fewer, reduce all ingredients in half.
Ingredients
This recipe was based on a Jamie Oliver recipe for Peachy Pork Chops. I changed it up a bit in order to try something new, replacing peaches with cherries and upping the Bourbon content. You can find the original recipe on the Jamie Oliver website. Note that there are many free recipes on his site and most, if not all, are worth trying.
2 bone-in pork chops, 2 sprigs rosemary, 3/4 pound of cherries, 1/3 cup bourbon, 1 garlic head, cut in half, leaving top intact (see pic), 2 tbsp. grapeseed or veggie oil, salt and pepper
Instruction
Halve and pit the cherries
If you have brined your chops, pat completely dry and pepper both sides. Do not add salt. If you have not brined, pat dry and salt and pepper generously.
If there is a large fat strip on the edge of your pork chops, score with a sharp knife to prevent the chop from curling up
Heat oil in the pan on medium/high heat (I prefer cast iron or HexClad) until shimmering and place chops into pan, away from you. Make sure they have strong contact with pan for best browning
Cook chops 4-5 mins on each side. Using tongs, turn the chops onto their sides to ensure the edges get browned. Remove and set aside. Internal temp should be 140-145 F
Reduce heat to medium. Add a bit more oil, if pan is dry. Add the cherries, rosemary sprigs and garlic (cut side down) to the pan. Sautee, moving cherries about until slightly softened
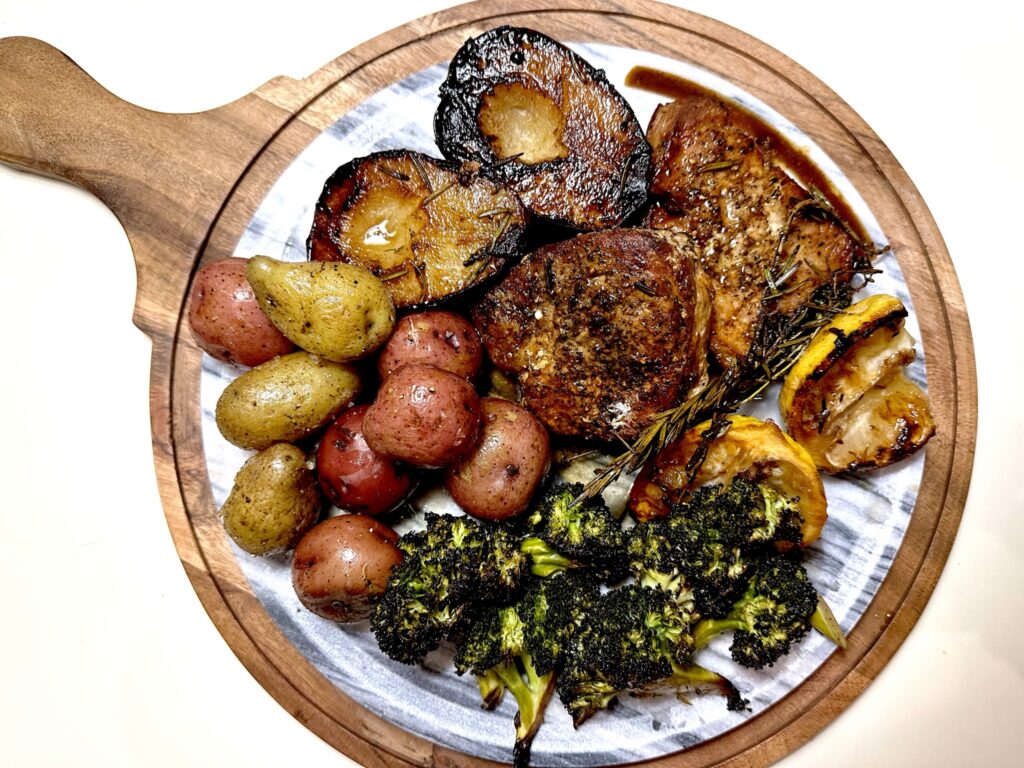
Return pork chops to pan. Add bourbon and carefully light with match to set the flambee. Be sure to step back as you light it. As you can see below, it can get a little wild! If you prefer not to light the bourbon, simply allow to burn off for a few mins until the smell of the bourbon is not quite as strong and it has reduced. If you do Flambee, allow flames to subside and plate up, allowing pork to rest approx. 5 mins. Allow each person eating to squeeze as much or as little garlic out of the garlic head, to add some buttery garlic flavor to complement the sweet bourbon and cherries! YUM!
Note that the flame shown below subsided immediately and no family members, animals or husbands were hurt in the making of these pork chops!
Perfect accompaniment
If you want to add some color and additional nutrition to your meal, when you add the pork chops back to the pan, include a small bunch of cleaned and trimmed asparagus. Once you remove the pork chops and cherries, check tenderness of the asparagus and allow to cook up to 5 minutes more until done to your liking. And, this adds a bit of nutritional balance!
Pro Tip
If you are new to the flambee situation, be sure to have someone who can not only take your pictures, but take action when the fire gets out of hand! So, thanks, John, for the backup!!
This is a recipe that I saw prepared some years ago on America’s Test Kitchen. This one is right up my alley because it is bold in flavor and is not just about the protein component, ground pork. It also has an amazing sauce, noodles and loads of greens.
What makes Bun Cha extra special? The sauce is pure flavor, the pork patties are juicy due to the use of a small amount of baking soda used, and the addition of mint as a core green element adds an unexpected, but exciting twist to the dish.
I followed the core America’s Test Kitchen recipe, making a few tweaks that I will include in the below Bun Cha recipe!
8 oz. of rice noodles. I selected the wider, linguini style, but vermicelli would be amazing as well.
2/3 of an English cucumber, peeled, cut in half, with seeds taken out. Slice into half moons, a little under 1/2 inch thick
1 cup of fresh, washed cilantro, end of stems cut, but balance included
3/4 cup fresh mint, very lightly chopped, leaving in large chunks
Lettuce of your choice. Typical recipe calls to chop Boston Bibb lettuce, but I love leaving the Boston lettuce in full leaves to use for wrapping, if making smaller pork patties
Sauce
3 Tbsp. sugar
1-2 garlic cloves, your choice
1/4 cup fresh lime juice
2/3 cup hot water
4-5 Tbsp. fish sauce. Start with 4, taste and adjust
1 Thai or serrano chili, stem removed and minced
Directions
Cook rice noodles per package instructions. Rinse and lay out on tray to pat them dry. Set aside
Assemble cilantro, mint, lettuce and cucumber on serving tray and refrigerate until other ingredients are ready
Build the sauce – if you have a mortar and pestle, mash 1 Tbsp. of the sugar, chili, and garlic into a fine paste. Mix with the hot water in a bowl, add the remaining sugar and stir to dissolve. Add the fish sauce and lime, whisk up and set aside. Alternatively, if you do not have a mortar and pestle, add all ingredients into a small food processor and chop until chili is fine and all is fully combined
For the pork patties – combine the pork, shallot, fish sauce, sugar, baking soda, and pepper in a bowl. The recipe calls for dividing the meat mixture into 12 patties. I divide into 6, to make the grilling easier, but either way works just fine. It is a matter of preference
Grill patties as you would a typical burger on your charcoal or gas grill. For smaller patties, higher heat and quick 3-4 mins per side will do it. If dividing into 6 larger burgers, lower the heat slightly and extend cooking time to get an inner temp of 155-160 F. There should be a nice char on the outside with a deliciously juicy inside!
Here is where there is some ability to tailor to taste. Typically, the patties are put into the bowl of sauce and tossed to coat before serving. If some like it real zesty at your table and others do not, serve the sauce on the side, allowing each diner to decide the amount of sauce for their noodles, greens and pork patty
Serve patties on tray with veg. and bowl up the noodles and sauce so individual plates can be tailored to taste
ENJOY!
Notes
This is a perfect recipe for mixing things up. Vary your noodles and veg, perhaps adding in some crunchy elements, such as carrot or radish. Have fun with it!
If this recipe tickles your fancy, check out my Asian inspired veggie salad feast recipe, which also is veggie forward with a bit of spice to it!
Who doesn’t love a sandwich? Easy, flexible and quick! However, adding a small twist can take a sandwich recipe from run of the mill to ooh la la! Add a side of crispy fries or chips and you have a winning lunch or dinner!
Years ago, my husband and I stayed at a small inn in Newburyport, MA called the Garrison Inn. At breakfast, I opted for a bacon, cheddar and apple sandwich on an English Muffin. This, at the time, sounded very strange, but interesting to me. It was amazing and changed how I thought about everyday ingredients! I have since become a huge advocate of sweet mixed with savory. Think pork chops with cherry sauce, or chicken and apples. Simply delicious! This sandwich recipe is my ode to the Garrison Inn and the amazing, creative menu that they had and, it appears, still have!
Heat half of the butter in a frying pan. Once it is just beginning to brown, press 2 of the slices of bread into pan, giving enough pressure to ensure entire surface is against the pan. I typically even put my tea kettle on top, to ensure the bottom is making good contact with the pan. Let sizzle until bread is browned and crispy and remove. Set aside. Repeat with other 2 slices of bread. I found this brand, “Jessica’s Brick Oven” and it is amazing! Hearty, healthy and delicious. However, I could see many other multigrain, hearty white or other breads that would fit the bill just perfectly.
Place apple on its’ side and slice 1/4″ slices from center of the apple. Snack on the outer bits, while you finish making your sandwiches! Note, for stability, if you cut one side of the apple flat and lay it on that flat side, you will have the stability to cut your slices without the apple rolling around. Just cut only enough to make a flat surface and not impact the ability to have round slices at the center of the apple.
Assemble 2 sandwiches, splitting the apple, turkey, cheddar and arugula amongst the slices of bread. Serve any remaining apple slices on the side. I think a sandwich is perfect with ruffled potato chips, like the reduced fat Utz ripples mentioned above, but an apple slaw, salad or any veggie side would be amazing with this sweet and savory treat!
Tips
Go for the salted butter and do not skimp! This gives a sumptuousness to the sandwich that allows you to skip adding condiments
Super sharp cheddar is what you want here. It has the bite that is the ying to the apple yang!
Sub in lettuce, if you do not have arugula on hand, but the arugula is the peppery bite that makes this sammie extra special!
If you are a huge fan of using condiments…go for it. Olive oil, mayo or even avocado could make this a flavor bomb, if that is your thing! Have fun with it!
If you like this recipe, you may also like my recipe for warm Venetian salad, which mixes greens, chicken, prosciutto cotto, sourdough bread and pears! Yum!
Split turkey breast is one of those items that, when I see it, I buy it. It is not always readily available , so I jump on it when I can. What is a split turkey breast, you ask.. Basically, the breast portion of a turkey is split into 2, typically sold bone-in and skin on. Most nights I am feeding only myself and my husband, John. To cook an entire turkey would be a bit of madness. But a 2.5 – 4 pound bone-in breast of turkey is perfect!
This recipe uses an herb spread that is put under the skin and very simple spices that form an amazing crust on the outer skin. Pair this with my go to vegetable tray bake for a delicious meal!
Ingredients
2.5 – 4 pound split turkey breast
3 Tbsp. butter
2 Tbsp. grapeseed or olive oil
2 Tbsp. chopped fresh parsley
2 Tbsp. dried rosemary divided
2 Tbsp. dried thyme divided
2 tsp. each kosher salt and coarse back pepper divided
Instruction
Preheat oven to 350 F.
Pat split turkey breast dry on all sides. Loosen skin, ensuring to not completely remove it. Mix the oil, butter, fresh parsley and 1 Tbsp. each of the rosemary and thyme, until fully combined. Rub under the skin, making sure to pull the skin fully back over the breast.
Mix remaining rosemary, thyme, salt and pepper. Sprinkle over the breast, as well as on backside bone. If you run short of spice to coat completely, simply add a bit more salt and pepper.
Roast on middle rack for 20 mins per pound. Begin checking the temp at thickest part of the breast at 40 mins. When temp reached 160 degrees, remove turkey from oven to cutting board and allow to rest 15-20 mins. You should have a beautifully browned skin on the outside and amazingly moist meat on the inside. Delicious!
There are some recipes that are so flexible and easy, that I go back to them quite consistently. This recipe is exactly that. A mixed tray of vegetables that are oven roasted with oil and spices. Because you can use just about any hearty vegetable for this recipe, it is a great “use what you have on hand” type of recipe
This vegetable recipe requires only a few turns with a spatula while cooking, so you are free to prepare other dishes while they are doing their thing. Although simple, there are a few key tips that take this simple side dish from good to great
Tips
For this specific recipe, I recommend heartier vegetables. Root vegetables are great options, as well as cauliflower, broccoli, brussels, or any winter squash
In order to allow all of the veg to cook roughly evenly, you will want to cut heartier veg to a smaller size and leave those, such as broccoli, a little bit bigger. This is not one to sweat though, any of the above mentioned veggies will be slightly more or less roasted and it is all good in the end
Occasionally toss in something that you would not usually think of roasting, such as red radish, daikon radish, celery root, jicama, or parsnip. Even some hearty fruits can be amazing. Think bosc pears or honeycrisp apples
Slice a garlic bulb in half, leaving a flat surface to place face down in roasting pan. When vegetables are done, garlic will be super soft and squeezable and can be served separately and added by each eater at your table as they desire
Instruction
Chop roughly 2 lbs. of varied vegetables. This should just fit into a standard baking tray. The more colorful, the better. This can really have wow factor on a platter on your table! Wash and dry as well as you can. This is where a salad spinner comes in handy.
Toss on tray with 1/4-1/2 cup of grapeseed or vegetable oil. Use just as much as needed to have a glossy coating over all veg. Sprinkle with kosher salt, pepper and rosemary. Add a few dashes of red wine vinegar and put into a preheated 400 F oven. Begin turning the veg occasionally once they have been in for 15 mins. They should be roasted nicely, with nice browning in 40 mins, but do a fork through the veg check each time you turn them.
Taste and add additional salt and pepper, to taste, as well as a drizzle over of extra virgin olive oil. Voila!
Note: I always make more vegetables than my husband and I can use in one sitting. I reheat in a sauté pan, or put under the broiler for a few mins to bring them back to life! Also, there are many alternatives, such as swapping out rosemary and thyme for togarashi or garam masala spice. Using a drizzle of lemon, rather than red wine vinegar. Have some fun with it!
Some nights I am content to spend a couple hours in the kitchen, challenging myself with new recipes or ingredients. Other nights, I want something interesting, but simple. This is that kind of a meal. Chinese sausages are charred in the oven and served with soba noodles and a crisp salad. These sausages were not something that I typically buy. I have seen a number of cooking shows making use of them, so when I came across them in the grocery, I decided to give them a go and create an easy charred Chinese sausage meal.
Ingredients
5 Store bought Chinese sausages, such as these pork sausages found at the local Hannaford. I am guessing there are many brands of varied qualities out there, but this is what was at hand
2.5 – 3 ounce of Soba noodles, such as these, found in our local Hannaford
Mixed green salad of your choice. Do include radishes in your salad! The crisp and spicy kick they give, goes incredibly well with the sweet sausage
2 scallions, chopped – green and whites
For the dressing:
6 Tbsp. grapeseed oil (or olive, if you prefer)
3 Tbsp. rice vinegar
1 Tbsp. honey (substitute in sugar, if no honey on hand)
1 Tbsp. mirin
3 Tsp. low sodium soy sauce
Instruction
The glory of this recipe is the simplicity and how quickly it comes together. Heat oven to 350 F. Put sausages in greased oven safe pan (preferably cast iron) and put into oven. After 15-20 mins, turn sausages. They should be charring nicely, with a crisp outer skin. Bake another 15-20 mins until cooked through (160 F for internal temp). Cooking sausage in the oven was a revelation for me some years ago. I love the charred exterior that you get, as well as the fact that the cook top evades the typical splatter factor!
While the sausages are cooking away, follow instructions on Soba package. Drain and set aside noodles. Assemble salad. Plate both salad and noodles. Put all dressing ingredients in a jar and shake vigorously. Taste and adjust to your liking. I prefer a little less vinegar and a bit salty sweet, but tinker until it is perfect for your taste. Dress the noodles and salad and add sausages over the noodles.
Why I loved this recipe
I knew to expect these Chinese sausages to be on the sweet side. The sweetness paired perfectly with the crunch of the salad and the punch of the Asian dressing. It literally hit all notes…sweet, salty, spicy, sour! The soba adds that last perfect bit of nutty, earthy flavor.
This recipe could be tweaked to use crunchy cabbage and carrots for a slaw, rather than salad, or Udon, rice or other noodles to mix it up. So many options! This one will be on my easy weeknight meal repertoire from here on out!
It is weekend and we are blessed with amazing weather. These kinds of days are made for grilling. Low effort, chill on the deck, pups in the yard, drink in the hand kind of cooking! And what says easy grilling, like a rotisserie chicken that, once rubbed and tines are set, you can let spin its way to juicy deliciousness?!
Note that this recipe assumes that you have a rotisserie grill attachment. I put off buying this for years and finally gave in last year. It has proven to be an awesome tool to have, so I have no regrets with the purchase. We went for the NexGrill Universal Rotisserie kit from Home Depot. We have had a Nexgrill for years, and despite the low cost and it being a big box store grill, we have been super pleased with both the grill and all attachments purchased.
The first step to getting your chicken going is deciding what type of rub you want. Here, you are open to doing as little or as much work as you want. If you have a favorite dry rub that you purchase and love, run with it! I typically have a few homemade and a few store bought spice mixes on hand, so I can run with my whimsy on any day. Cavender’s Greek seasoning is super tasty and Goya has a seasoning for every taste as well. But, it is easy to whip up a batch of rub and keep what is not used in a mason jar, so next time, the work is already done!
Quick Chicken/Pork Rub Recipe
1 Tbsp. each of Garlic Powder, Onion Powder, Sweet Paprika, Brown Sugar
1 Tsp, each of cinnamon, pepper (fresh ground preferably) and salt
This is enough for roughly a 4 lb. chicken. Double, triple or quadruple the recipe to keep some in the cabinet for other recipes. I use this both for pork and chicken, so it does not go to waste!
Prepping the chicken
Grab a baking sheet with shallow sides that will fit into your grill. This will be your work surface for prepping the chicken, as well as the base under the chicken while on the grill. After patting the chicken completely dry, tuck the wings under the body, spice the inside of the bird with your rub and tie the legs tightly together with kitchen twine to get the legs nice and tight against the bird. Some will say you need to truss the chicken in, what I consider, an expert way, but getting the legs tight against the body is enough. Insert the rotisserie tines from both ends, positioning to get the best grip on the chicken. This can take some time and maneuvering. Once nice and tight, tighten the screws to secure the prongs in place.
Generously rub the chicken all over with spice rub. Make sure to get into creases of the legs and wings and full coverage, back and front. You are ready to go!! Put the rotisserie rod into the rotator attachment and start it up!
Cooking
This is the bit that can get a little tricky. Every grill has its’ own personality. Some burn hot and some are shy. In general, you want to keep the temp at about 400 degrees. I recommend starting with all burners on low and check what temp you get with the lid closed. If temp is spiking, turn 1-2 of the burners off completely to maintain steady heat. It is indirect heat, so which burners is less important than getting the temp in the 375-415 or so range. Once the chicken is on, melt 1/4 cup of butter with a 1/4 cup grapeseed or other high heat oil (I do not recommend olive oil). Once the chicken begins to form an outer crust and there is a little sizzle happening, begin basting occasionally.
For a 4 lb. bird, it will take about 60-90 mins total on the grill. The chicken is done when the middle of the breast is at 160-165 degree and thigh is 150-155 degrees F. Remove and let rest on rotisserie rod for 15-20 mins.
Serving
I served with roasted carrots and broccoli. You could also put sliced potatoes, sweet potatoes or onions in the roasting tray below the chicken to soak up the basting and chicken juices. I will warn though that you need to check the amount of clearance you have from the chicken to the tray, may need to add vegetable stock or more oil as you go, and watch for potential burning. However, if you have a juicy bird, these veggies are amazing!
If this recipe sounds good to you, you might like my recipe for weeknight pork loin with plantains and delicious veggies!
Follow:
Subscribe to see our latest food, travel and home life updates by entering your email info below